This article was published as part of the Data Science Blogathon
Introduction
Understanding, let's explore a bit in depth about MongoDB and Django.
At the end of this article, have a basic understanding of the following:
- What is MongoDB?
- What is django?
- Methods to connect to MongoDB using Django.
Now, without any more preambles, let's start …
1. What is MongoDB?
First, let's see the official definition …
MongoDB is a document database, which means it stores data in JSON-like documents. We think this is the most natural way to think about data and is much more expressive and powerful than the traditional row model / columns.
Source: https://www.mongodb.com/
In simple words .... the traditional way of storing and using any data is structured (table or row format / column). But in real time, this is not how data is received or stored. The data can have any number of fields or parameters to store. MongoDB stores the data in a similar format using JSON-like documents and NoSQL is used to access the stored data.
2. What is django?
Django is a high-level Python web framework that encourages rapid development and clean, pragmatic design. Created by experienced developers, takes care of much of the hassle of web development, so you can focus on writing your application without reinventing the wheel. It's free and open source.
Source: https://www.djangoproject.com/
Django was designed to build websites of almost any type and because it is a property that understands almost any format, including HTML, RSS feeds, JSON, XML, etc., can also be used to connect with MongoDB because MongoDB also uses JSON format .
We will now look at different ways to connect to MongoDB and explore connecting to MongoDB using Django in detail.
There are three different ways to connect with MongoDB using Django easily, Like shown in the next figure. Let's see each method one by one.
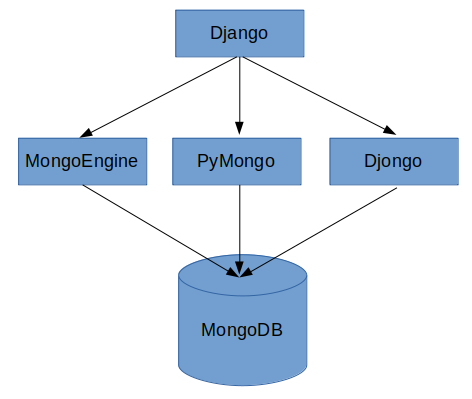
Source: myself
In this article, we will focus on the Djongo method in detail.
3.1 MongoEngine
MongoEngine is an object and document mapper (think of ORM but for document databases) to work with MongoDB from Python. (Source: http://mongoengine.org/#home)
Let's see how to configure MongoEngine and connect to MongoDb using it.
Paso 1: installation:
pip install -u mongoengine
Paso 2: Requirements:
- MongoDB 3.4, 3.6, 4.0 (https://www.mongodb.com/try/download/community)
- pymongo> = 3.4 (https://pypi.org/project/pymongo/)
Make sure you have the above requirements installed before proceeding to the next steps.
Paso 3: draft / settings.py
After starting the Django project, open the settings.py file and add these lines. What's more, delete or comment on the databases section as shown in the following code snippet.
import mongoengine
mongoengine.connect(db=DATABASE_NAME, host=DATABASE_HOST, username=USERNAME, password=PASSWORD)
#DATABASES = {
# 'default': {
# 'ENGINE': 'djongo', #'django.db.backends.sqlite3',
# 'NAME': 'blogs', # DB name
# 'USER': 'root', # DB User name <optional>
# }
#}
No need to do emigrate Y make migrations because you are using MongoEngine ORM.
What's more, your file models.py will look as shown in the following code snippet.
Paso 4: draft / modelos.py
from mongoengine import Document, fields
class Blogs(Document):
   name = fields. StringField()
   topic = fields. StringField()
   date = fields. DateTimeField()
   addition_info = fields. DictField()
Now, you're ready to go and you can also check out more about MongoEngine here. http://docs.mongoengine.org/ Y https://github.com/MongoEngine/mongoengine
3.2 PyMongo
This is a tool that contains the Python distribution for working with MongoDB. This is good for writing and saving JSON data to your MongoDB. This tool will allow you to use all mongo queries in your code.
Let's see the step to set up pymongo and connect to MongoDB using this approach.
Paso 1: installation:
pip install pymongo
Paso 2: draft / utils.py
After starting the Django project, do the following:
create utils.py in the project folder and add these lines
from pymongo import MongoClient
def get_db_handle(db_name, host, port, username, password):
    client = MongoClient(host=host,
                         port=int(port),
                         username=username,
                         password=password
                        )
    db_handle = client[db_name]
    return db_handle, client
def get_collection_handle(db_handle,collection_name):
    return db_handle[collection_name]
Now, you can use the functions mentioned above in your views.py file or anywhere you want to get or write data to your MongoDB
Paso 3: draft / views.py
from project.utils import get_db_handle, get_collection_handle
db_handle, mongo_client = get_db_handle(DATABASE_NAME, DATABASE_HOST, DATABASE_PORT, USERNAME, PASSWORD)
collection_handle = get_collection_handle(db_handle, REGIONS_COLLECTION)
collection_handle.find({...})
collection_handle.insert({...})
collection_handle.update({...})
You don't need to do anything in project / models.py when using PyMongo. What's more, no need to add anything in the project / settings.py, but don't forget to comment out the DATABASES part in the project file / settings.py.
3.3 Djongo
Here we will see how to install MongoDB, Django and connect using the Djongo method.
Let us begin…..
Paso 1: How to install MongoDB
Go to the official MongoDB website and download the MongoDB community server.
Source: https://www.mongodb.com/try/download/community
Paso 2: How to download MongoDB Compass
Follow the link mentioned below to download and install MongoDB Compass.
Source: https://www.mongodb.com/try/download/compass
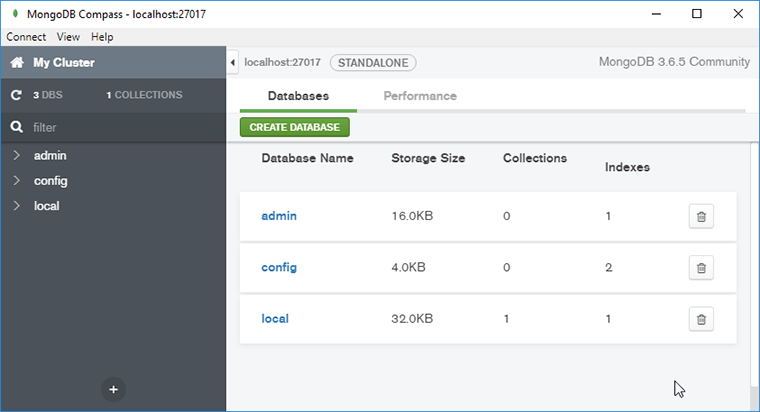
Paso 3: Create a database using MongoDB Compass
After the installation is complete, open MongoDB Compass on your system and create MongoDB or NoSQL database as shown below.
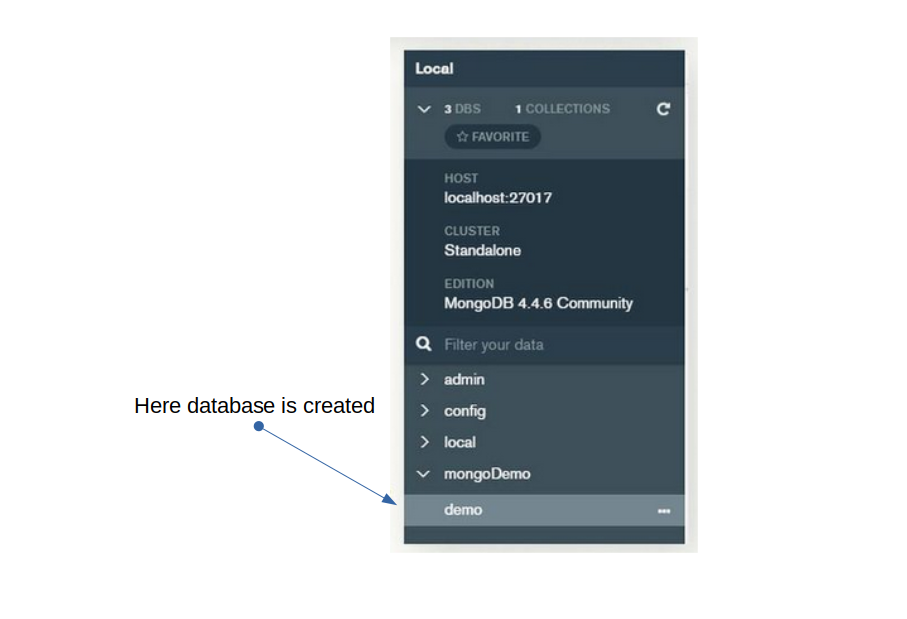
To create a database, click on the 'CREATE DATABASE' button. Once you click the button, the demo database is created as shown in the following figure.
Paso 4: How to install the Django package
Open terminal or git_bash (if you are using Windows operating system) and just hit this command to install this package on your system.
pip install django
Paso 5: create project
Go to the location of your choice and create a Django project using the following command in terminal:
django-admin startproject mysite
Paso 6: make changes to the settings.py file
Open the file setting.py and simply add this database configuration
#If your database is in your local machine
DATABASES = {
   'default': {
      'ENGINE': 'djongo',
      'NAME': 'your-db-name',
   }
}
Paso 7: run the migrate command
python3 manage.py migrate
If you don't see an error message, then you have successfully connected to MongoDB using djongo.
That's … 🙂
Conclution
In this article, we explore what MongoDB is, Django and ways to connect with MongoDB using Django. I hope you now better understand the topics discussed above.
Feel free to send us a comment in case of any queries. Any comments are welcome and will help me improve the content of my article.
Have a nice day... : )
The media shown in this article is not the property of DataPeaker and is used at the author's discretion.


