Target
- The dashboard is a powerful concept that allows the user to see hidden insights deeper into the data.
- Learn how to create your first panelA panel is a group of experts that meets to discuss and analyze a specific topic. These forums are common at conferences, seminars and public debates, where participants share their knowledge and perspectives. Panels can address a variety of areas, from science to politics, and its objective is to encourage the exchange of ideas and critical reflection among the attendees.... In Tableau
Introduction
Suppose that the leadership of the Superstore has commissioned us to do an analysis and design a report that includes the number of sales of the Superstore. Now, here is the challenge, they don't want to see four different report pages or four different Tableau worksheets.
Executives don't have the time or patience to flick through pages or tabs to discern what's going on. This is when dashboards come in handy. Dashboards are a powerful way to show different visualizations and analytics under one umbrella..
Note: If you are more interested in learning concepts in an audiovisual format, we have this full article explained in the video below. If that is not the case, you can keep reading.
In this article, we are going to design our first dashboard to help the superstore team understand the number of sales both at a general and granular level.
Before you start creating your dashboard with Tableau, it is good practice to design it by hand with pencil and paper. That means you must first tell the story. You should have a clear picture of what you want to display on the board before opening and starting to design the display.
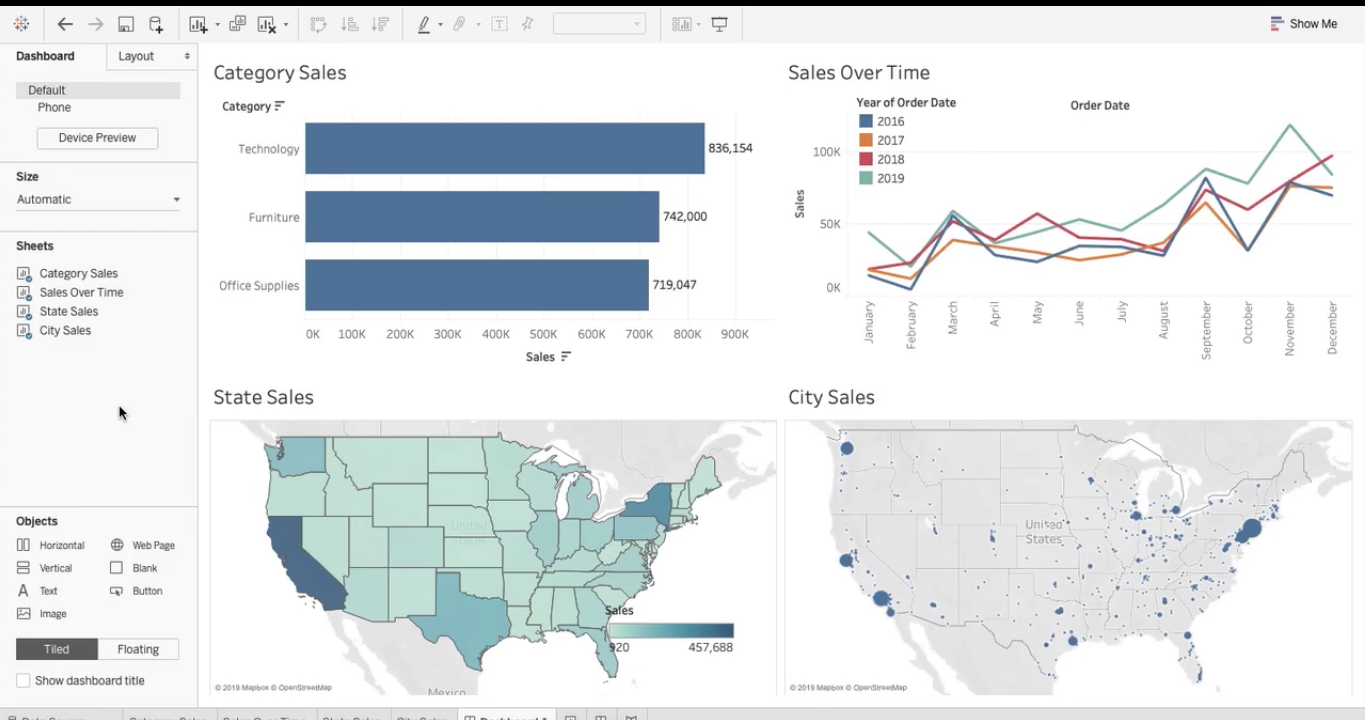
In this panel, I will show four things
- Sales numbers by category.
- Sales numbers over time.
- Sales performance by states
- Sales by city
Then, These are the four views I want in the sales panel of my hypermarket. Let's start creating the dashboard with Tableau.
Leaf 1
The first visualization is the sales by category. For this, I will select Category and Sales in the data panel and place them on the Row and Column shelf respectively.
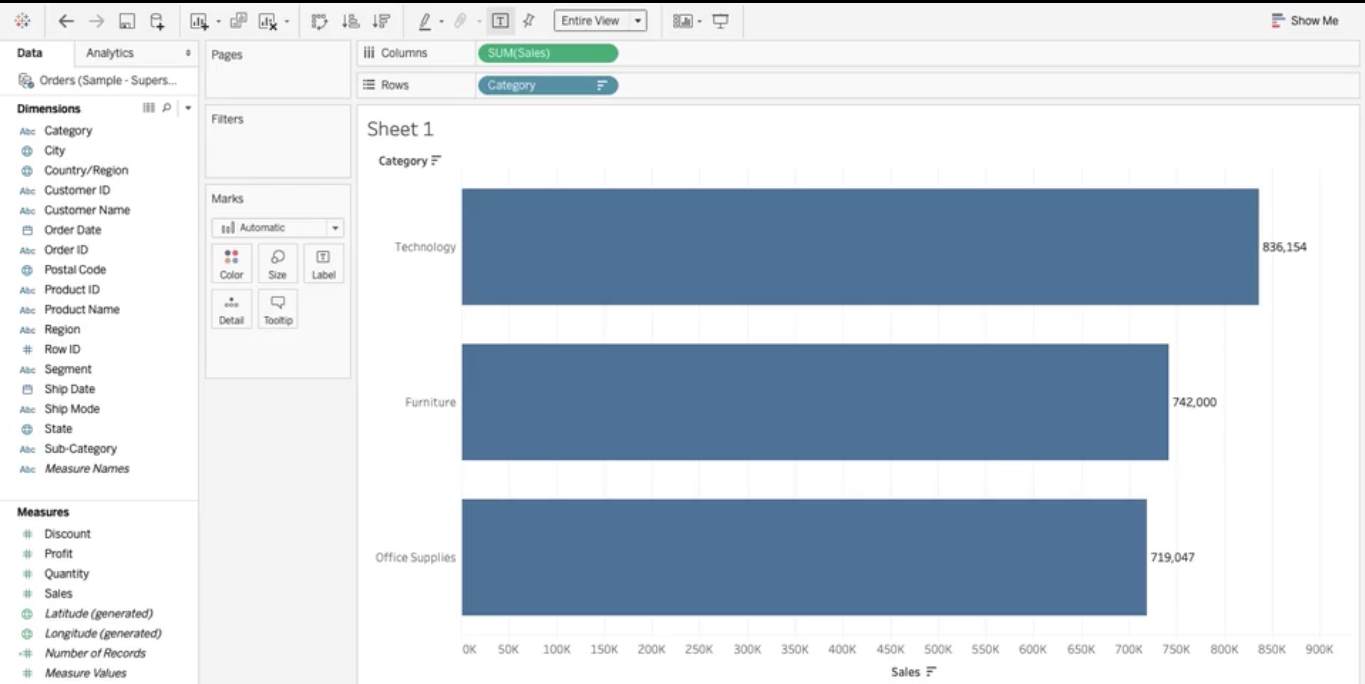
Remember to rename all sheets, as they are very useful when designing a board.
Leaf 2
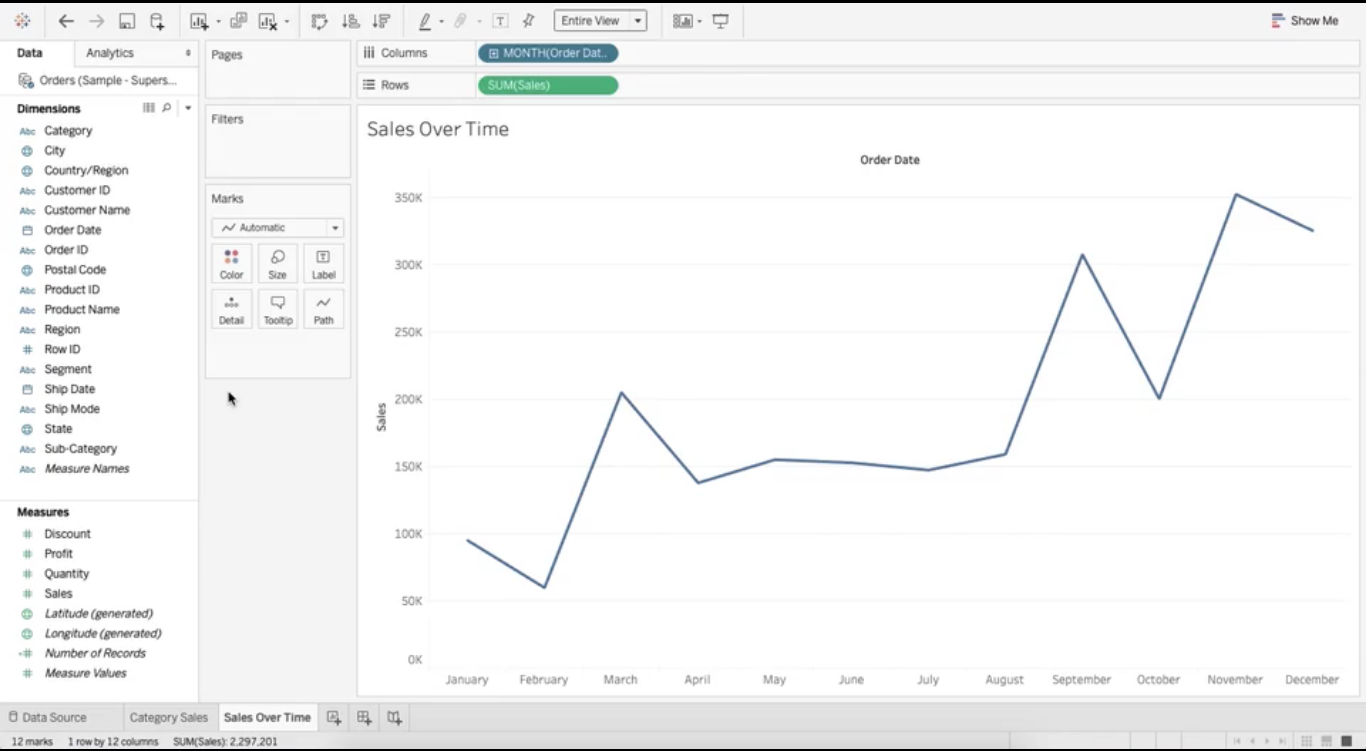
The second sheet is for Sales over time. That means how the number of sales behaved over the years or months. For this, select Sales and drag to the Rows and drop Order Date in the columns.
To move this visualization to a more granular level. Click on the + in the year on the column shelf. Clicking first, the quarter will appear and another click on the quarter, the month will appear. Now release the year and the quarter. Create a monthly view of sales.
But what I want is a comparison of sales per month over the years. That means how was the performance in January 2016 compared to January 2017. To do this, select Order Date in the data panel and place it on the color card. Here is your result.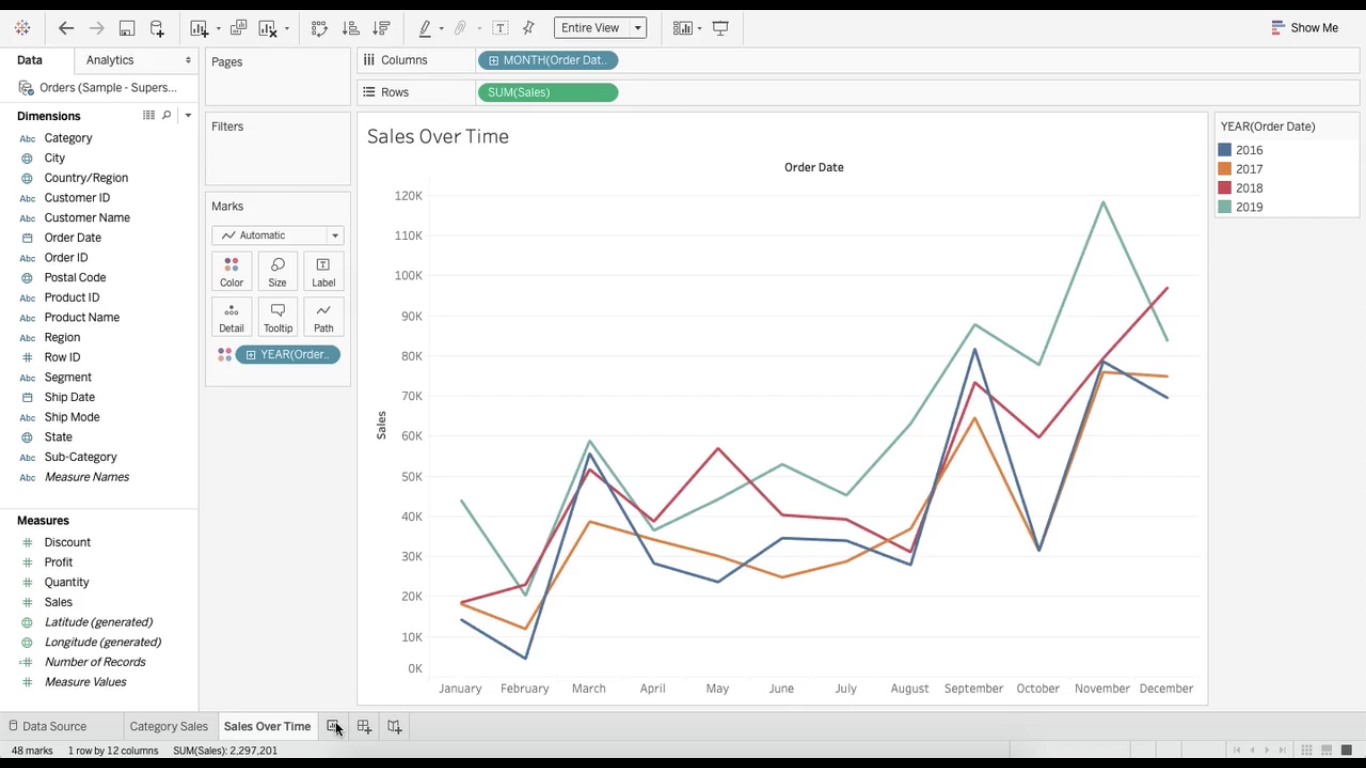
Leaf 3
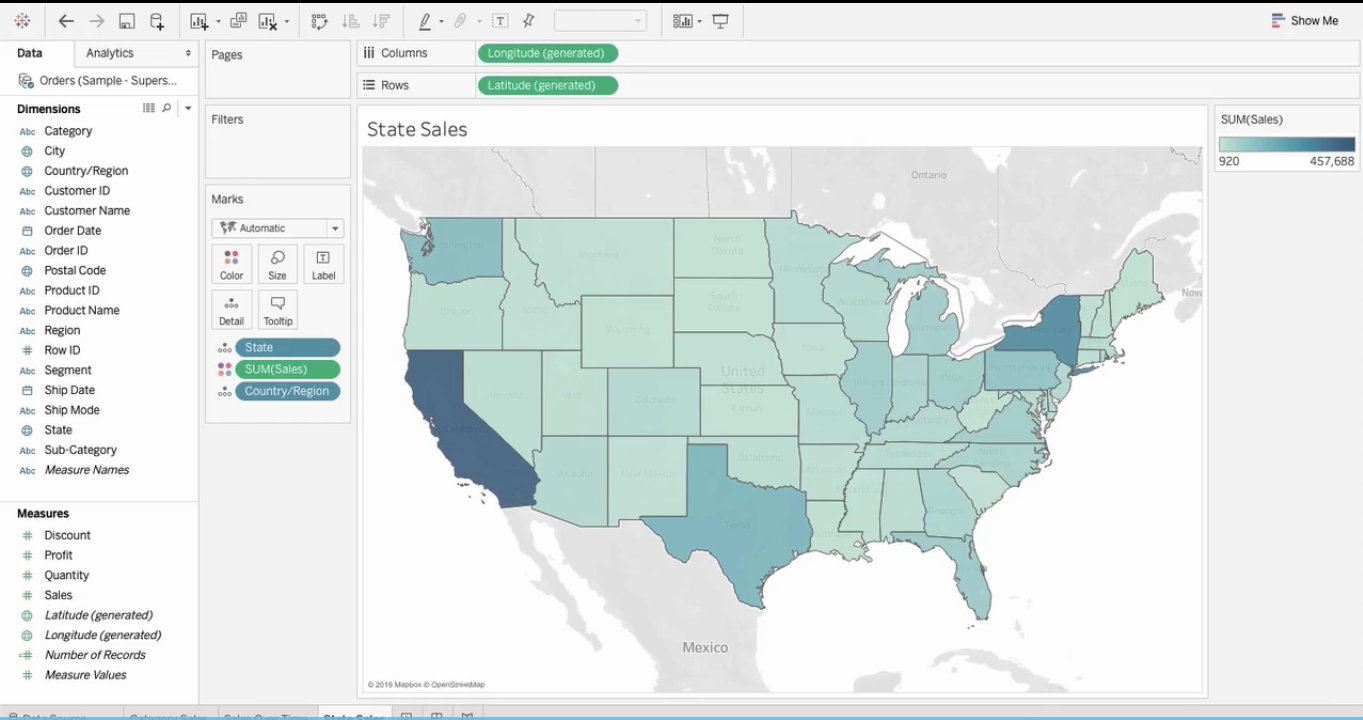
Now let's create our third sheet. In this frame, we will represent the distribution of sales in the states. That means it will be a geospatial analysis..
Select Sales and Status by pressing ctrl + click and click show me. Of the recommended visualizations, select the map. Click on the 49 unknown messages. Go to “Edit locations”, then go to the country / region, select “from the field”. The United States will appear by itself and click OK. and we have Sales by State.
Leaf 4
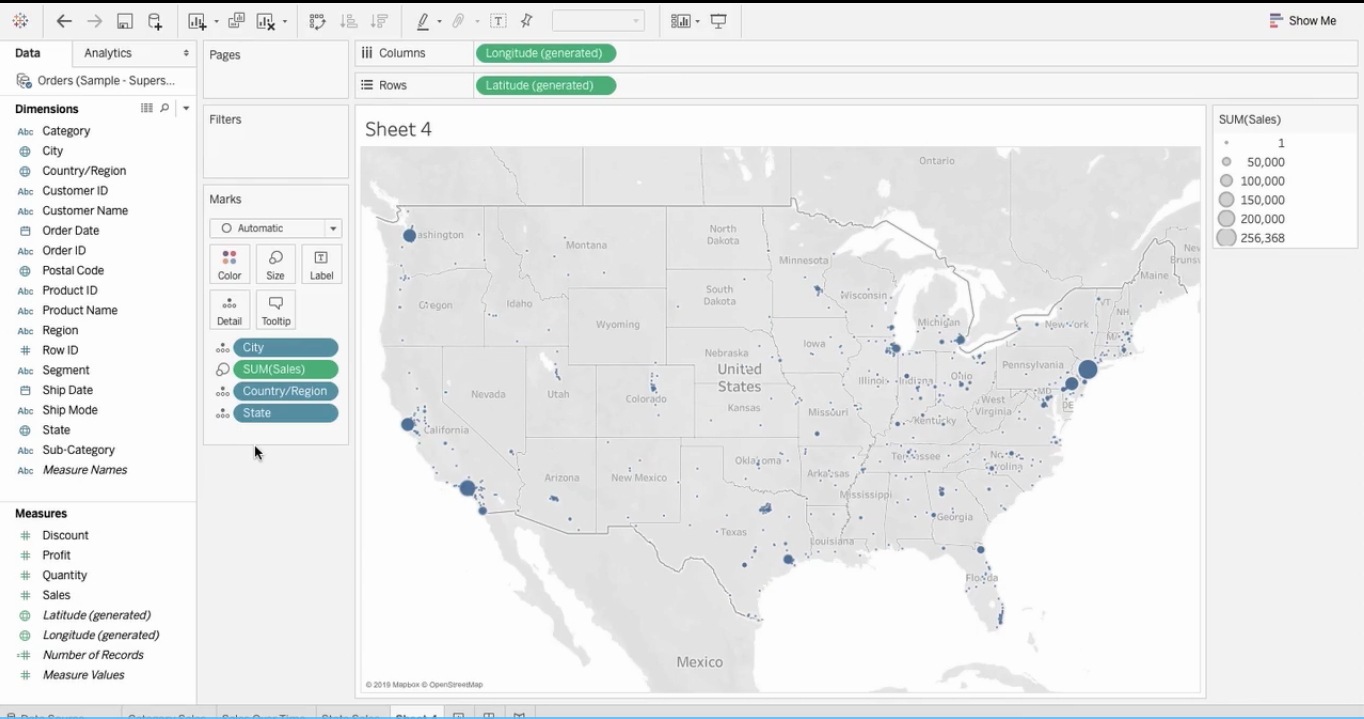
Finally, let's create our fourth visualization. Here, we will show the distribution of Sales by city. similar to the last graph, select Sales and City and click show me. Then click on the recommended display. Again we have 530 unknowns, click on that and then edit the locations. Go to the country and click on them from the field. You will see the United States appear, click ok.
Here we have the sales figures for the city. To get a better idea of the cities, select Status in the data panel and place it in the details card.
Now that all of our sheets are ready, let's create the Dashboard.
Create a dashboard
To create a new board, click on the icon on the bottom bar to display the text “New board”. When your dashboard appears, you can see all the worksheets you have created in one side panel.
On a board, have the option to change the dashboard view. Can be default or phone view. I don't like the current media view of my dashboard, to change this, click the size drop down menu and automatically select. It may seem like a small thing, but trust, can break all your experience with the board.
Now just drag and drop all the sheets from the sidebar to the board. Here is your first control panel.
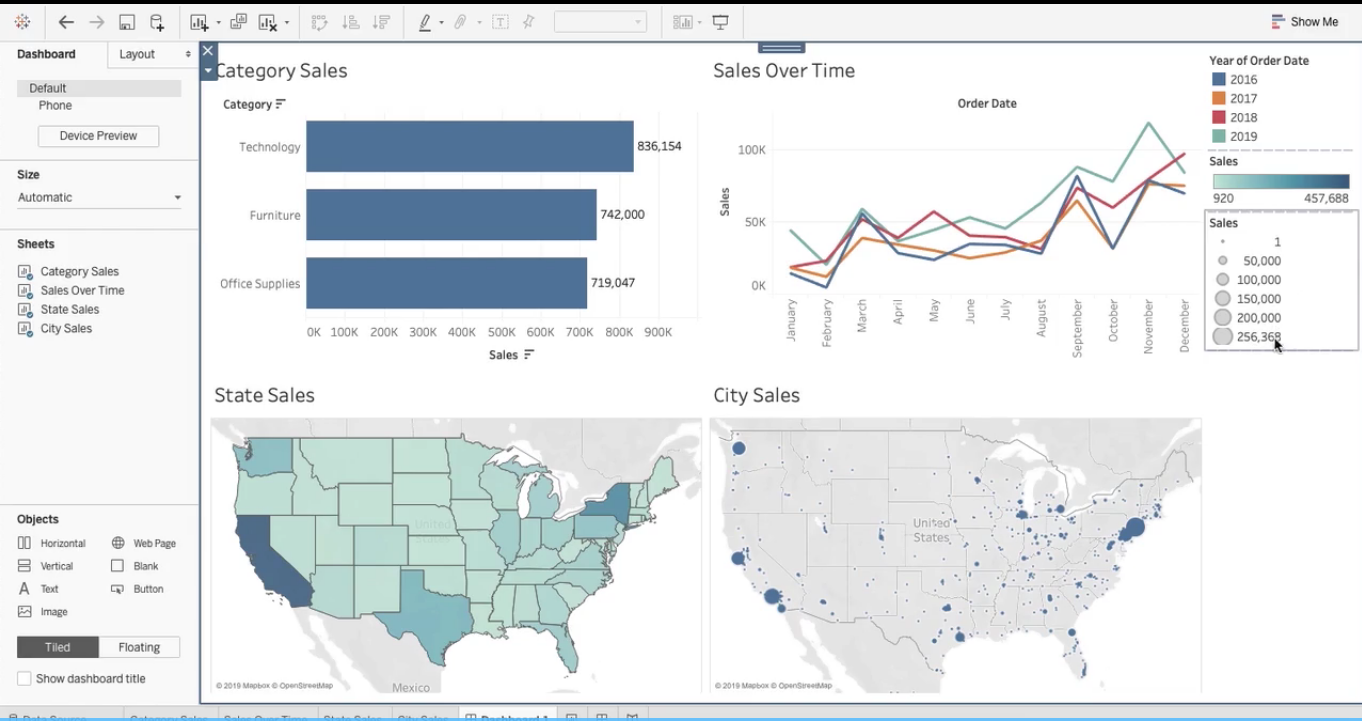
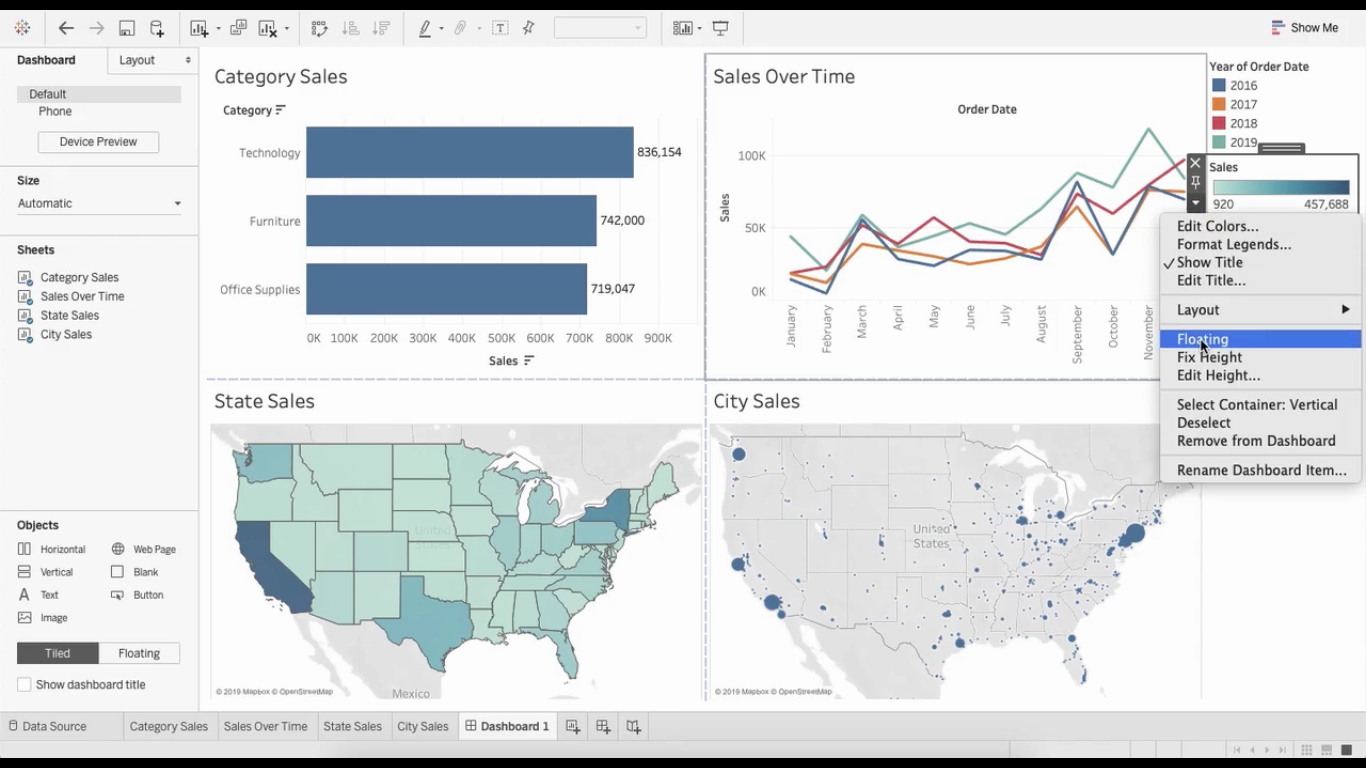
Even so, there are some little things you can work with, since I don't like the space we leave on the right due to the legends. We can use that space creatively. Tableau allows us to completely remove these legends or move them to another place by making them floating.
To remove the sales legend, since it does not contribute anything to the board, click on the cross icon and it will disappear. For others, click legend then arrow and select float as shown below. Now you can drag and drop it anywhere you want on the board.
In the same way, you can move the date of the order year to the respective display. So we have our hypermarket sales number ready for leadership to infer and plan accordingly.. Here is the final board.
Final notes
That's all about the dash in the box in this article. You can make your dashboards more interactive by using parametersThe "parameters" are variables or criteria that are used to define, measure or evaluate a phenomenon or system. In various fields such as statistics, Computer Science and Scientific Research, Parameters are critical to establishing norms and standards that guide data analysis and interpretation. Their proper selection and handling are crucial to obtain accurate and relevant results in any study or project..... The parameter is an interesting concept in Tableau that puts more power in the hands of the user and makes the visualization dynamic.
If you are looking to start your data science journey and want all topics under one roof, your search stops here. Take a look at DataPeaker's certified AI and ML BlackBelt Plus Program
If you have any question, let me know in the comment section!