
This article was published as part of the Data Science Blogathon
Introduction
Hello readers!
Deep learning is used in many applications, such as object detection, face detection, natural language processing tasks and many more. In this blog I am going to build a model that will be used to solve unsolved Sudoku from an image using deep learning, we go to libraries like OpenCV and TensorFlow. If you want to know more about OpenCV, check this Link. Then let's get started.
- If you want to know about Python libraries for image processing, then check this out Link.
- For more articles, Click here.
Image Source
The blog is divided into three parts:
Part 1: Digit classification model
We will first build and train a neural network on the Char74k image data set for digits. This model will help to classify the digits of the images.
Part 2: Read and detect Sudoku from an image
This section contains, identifying the puzzle from an image with the help of OpenCV, sort the digits in the detected Sudoku puzzle using Part 1, finally get the values of the Sudoku cells and store them in an array.
Part 3: Solving the puzzle
We are going to store the matrix we got in Pat-2 as a matrix and finally we will run a recursion loop to solve the puzzle.
IMPORTING LIBRARIES
We are going to import all the required libraries using the following commands:
import numpy as np
import pandas as pd
import seaborn as sns
import matplotlib.pyplot as plt
import os, random
import cv2
from glob import glob
import sklearn
from sklearn.model_selection import train_test_split
import tensorflow as tf
from tensorflow import keras
from tensorflow.keras.preprocessing.image import ImageDataGenerator
from keras.preprocessing.image import ImageDataGenerator, load_img
from keras.utils.np_utils import to_categorical
from tensorflow.keras.models import Sequential
from tensorflow.keras.layers import Activation, Dropout, Dense, Flatten, BatchNormalization, Conv2D, MaxPooling2D
from tensorflow.keras.optimizers import RMSprop
from tensorflow.keras import backend as K
from tensorflow.keras.preprocessing import image
from sklearn.metrics import accuracy_score, classification_report
from pathlib import Path
from PIL import Image
Part 1: Digit classification model
In this section, we will use a digit classification model.
LOADING DATA
We will use an image data set to classify the numbers in an image. Data is specified as features such as images and labels as labels.
#Loading the data
data = os.listdir("digits/Digits" )
data_X = []
data_y = []
data_classes = len(data)
for i in range (0,data_classes):
data_list = os.listdir("digits/Digits" +"/"+str(i))
    for j in data_list:
pic = cv2.imread("digits/Digits" +"/"+str(i)+"/"+j)
pic = cv2.resize(pic,(32,32))
data_X.append(pic)
data_y.append(i)
if len(data_X) == len(data_y) :
print("Total Dataponits = ",len(data_X))
# Labels and images
data_X = np.array(data_X)
data_y = np.array(data_y)

DIVIDED DATA SET
We are dividing the data set into train sets, testing and validation as we do in any machine learning problem.
#Spliting the train validation and test sets
train_X, test_X, train_y, test_y = train_test_split(data_X,data_y,test_size=0.05)
train_X, valid_X, train_y, valid_y = train_test_split(train_X,train_y,test_size=0.2)
print("Training Set Shape = ",train_X.shape)
print("Validation Set Shape = ",valid_X.shape)
print("Test Set Shape = ",test_X.shape)

Procesamiento previo de las imágenes para la red neuronalNeural networks are computational models inspired by the functioning of the human brain. They use structures known as artificial neurons to process and learn from data. These networks are fundamental in the field of artificial intelligence, enabling significant advancements in tasks such as image recognition, Natural Language Processing and Time Series Prediction, among others. Their ability to learn complex patterns makes them powerful tools..
In a preprocessing step, we preprocess the characteristics (images) grayscale, normalizing and enhancing them with histogram equalization. Thereafter, convert them to NumPp arrays and then modify them and increase the data.
def Prep(img):
img = cv2.cvtColor(img,cv2.COLOR_BGR2GRAY) #making image grayscale
img = cv2.equalizeHist(img) #Histogram equalization to enhance contrast
img = img/255 #normalizing
    return img
train_X = np.array(list(map(Prep, train_X)))
test_X = np.array(list(map(Prep, test_X)))
valid_X= np.array(list(map(Prep, valid_X)))
#Reshaping the images
train_X = train_X.reshape(train_X.shape[0], train_X.shape[1], train_X.shape[2],1)
test_X = test_X.reshape(test_X.shape[0], test_X.shape[1], test_X.shape[2],1)
valid_X = valid_X.reshape(valid_X.shape[0], valid_X.shape[1], valid_X.shape[2],1)
#Augmentation
datagen = ImageDataGenerator(width_shift_range=0.1, height_shift_range=0.1, zoom_range=0.2, shear_range=0.1, rotation_range=10)
datagen.fit(train_X)
A hot coding
In this section, we will use one-hot encoding to label the classes.
train_y = to_categorical(train_y, data_classes)
test_y = to_categorical(test_y, data_classes)
valid_y = to_categorical(valid_y, data_classes)
MODEL CONSTRUCTION
Estamos utilizando una red neuronal convolucionalConvolutional Neural Networks (CNN) are a type of neural network architecture designed especially for data processing with a grid structure, as pictures. They use convolution layers to extract hierarchical features, which makes them especially effective in pattern recognition and classification tasks. Thanks to its ability to learn from large volumes of data, CNNs have revolutionized fields such as computer vision.. para la construcción de modelos. It consists of the following steps:
#Creating a Neural Network
model = Sequential()
model.add((Conv2D(60,(5,5),input_shape=(32, 32, 1) ,padding = 'Same' ,activation='relu')))
model.add((Conv2D(60, (5,5),padding="same",activation='relu')))
model.add(MaxPooling2D(pool_size=(2,2)))
#model.add(Dropout(0.25))
model.add((Conv2D(30, (3,3),padding="same", activation='relu')))
model.add((Conv2D(30, (3,3), padding="same", activation='relu')))
model.add(MaxPooling2D(pool_size=(2,2), strides=(2,2)))
model.add(Dropout(0.5))
model.add(Flatten())
model.add(Dense(500,activation='relu'))
model.add(Dropout(0.5))
model.add(Dense(10, activation='softmax'))
model.summary()
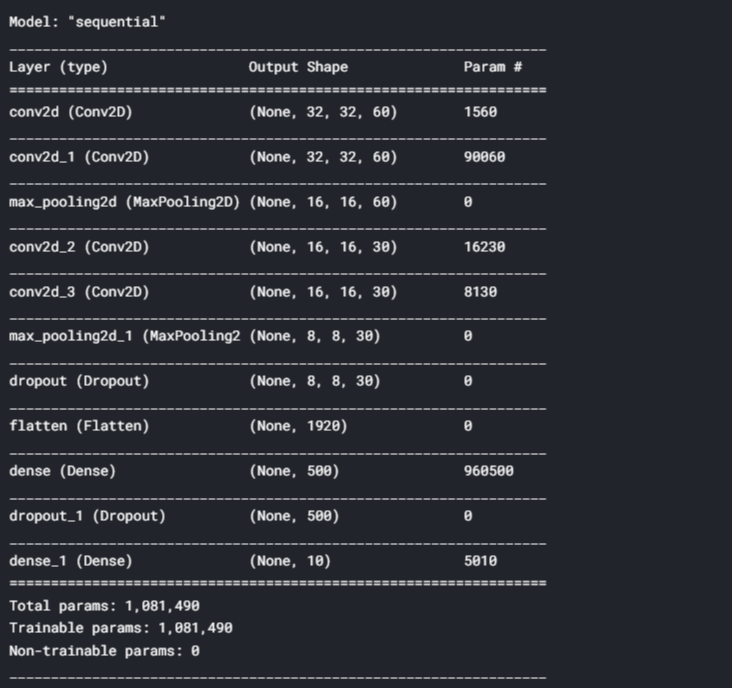
In this step, we will compile the model and test the model on the test set as shown below:
#Compiling the model
optimizer = RMSprop(lr=0.001, rho=0.9, epsilon = 1e-08, decay=0.0)
model.compile(optimizer=optimizer,loss="categorical_crossentropy",metrics=['accuracy'])
#Fit the model
history = model.fit(datagen.flow(train_X, train_y, batch_size=32),
                              epochs = 30, validation_data = (valid_X, valid_y),
                              verbose = 2, steps_per_epoch= 200)

# Testing the model on the test set
score = model.evaluate(test_X, test_y, verbose=0)
print('Test Score=",score[0])
print("Test Accuracy =', score[1])

Part 2: Read and detect Sudoku from an image
READ THE PUZZLE SUDOKU
Read a Sudoku using OpenCv using the following code:
# Randomly select an image from the dataset
folder="sudoku-box-detection/aug"
a=random.choice(os.listdir(folder))
print(a)
sudoku_a = cv2.imread(folder+'/'+a)
plt.figure()
plt.imshow(sudoku_a)
plt.show()
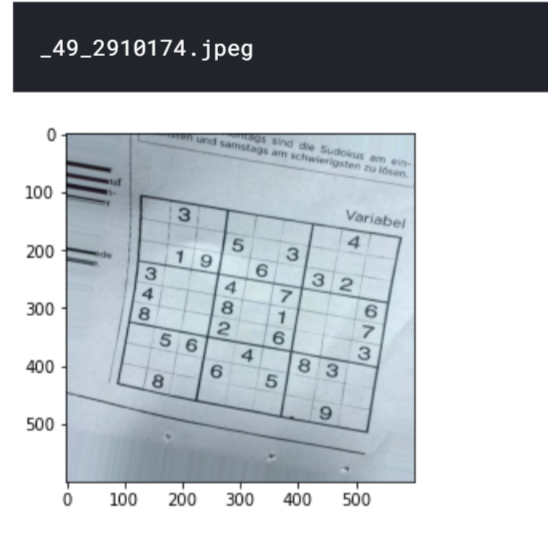
Preprocess the image for more detailed analysis using the following code;
#Preprocessing image to be read
sudoku_a = cv2.resize(sudoku_a, (450,450))
# function to greyscale, blur and change the receptive threshold of image
def preprocess(image):
gray = cv2.cvtColor(image, cv2.COLOR_BGR2GRAY)
blur = cv2.GaussianBlur(gray, (3,3),6)
    #blur = cv2.bilateralFilter(gray,9,75,75)
threshold_img = cv2.adaptiveThreshold(blur,255,1,1,11,2)
    return threshold_img
threshold = preprocess(sudoku_a)
#let's look at what we have got
plt.figure()
plt.imshow(threshold)
plt.show()
DETECTING CONTOUR
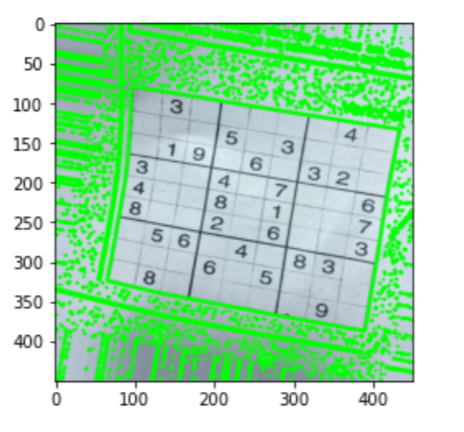
In this section, let's detect the contour. We continue to detect the largest contour of the image.
# Finding the outline of the sudoku puzzle in the image
contour_1 = sudoku_a.copy()
contour_2 = sudoku_a.copy()
contour, hierarchy = cv2.findContours(threshold,cv2.RETR_EXTERNAL,cv2.CHAIN_APPROX_SIMPLE)
cv2.drawContours(contour_1, contour,-1,(0,255,0),3)
#let's see what we got
plt.figure()
plt.imshow(contour_1)
plt.show()
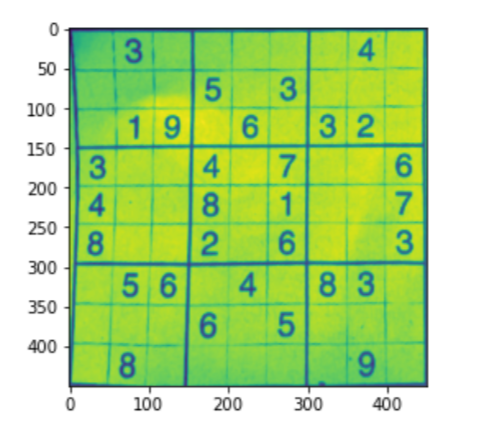
The following code is used to get the Sudoku trimmed and well aligned by reshaping it.
def main_outline(contour):
biggest = np.array([])
max_area = 0
    for i in contour:
area = cv2.contourArea(i)
        if area >50:
peri = cv2.arcLength(i, True)
approx = cv2.approxPolyDP(i , 0.02* peri, True)
            if area > max_area and len(approx) ==4:
biggest = approx
max_area = area
    return biggest ,max_area
def reframe(points):
points = points.reshape((4, 2))
points_new = np.zeros((4,1,2),dtype = e.g. int32)
add = points.sum(1)
points_new[0] = points[e.g. argmin(add)]
points_new[3] = points[e.g., argmax(add)]
diff = np.diff(points, axis =1)
points_new[1] = points[e.g. argmin(diff)]
points_new[2] = points[e.g., argmax(diff)]
    return points_new
def splitcells(img):
rows = np.vsplit(img,9)
boxes = []
    for r in rows:
cols = np.hsplit(r,9)
        for box in cols:
boxes.append(box)
    return boxes
black_img = np.zeros((450,450,3), e.g. uint8)
biggest, maxArea = main_outline(contour)
if biggest.size != 0:
biggest = reframe(biggest)
cv2.drawContours(contour_2,biggest,-1, (0,255,0),10)
pts1 = e.g. float32(biggest)
pts2 = e.g. float32([[0,0],[450,0],[0,450],[450,450]])
matrix = cv2.getPerspectiveTransform(pts1, pts2)
  imagewrap = cv2.warpPerspective(sudoku_a,matrix,(450,450))
imagewrap =cv2.cvtColor(imagewrap, cv2.COLOR_BGR2GRAY)
plt.figure()
plt.imshow(imagewrap)
plt.show()
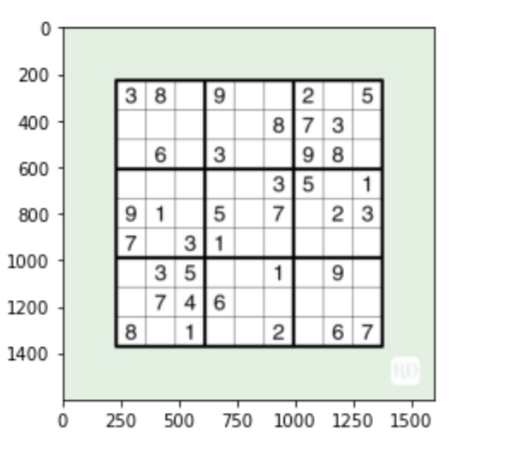
# Importing puzzle to be solved
puzzle = cv2.imread("su-puzzle / su.jpg")
#let's see what we got
plt.figure()
plt.imshow(puzzle)
plt.show()
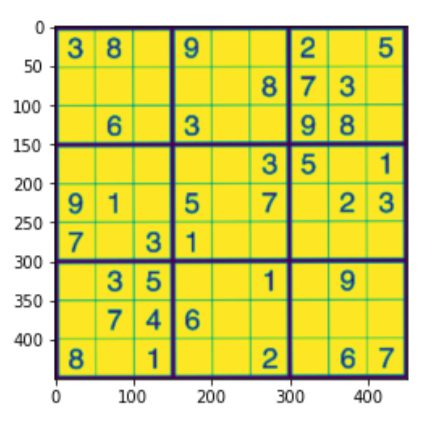
# Finding the outline of the sudoku puzzle in the image
su_contour_1= su_puzzle.copy()
su_contour_2= sudoku_a.copy()
su_contour, hierarchy = cv2.findContours(su_puzzle,cv2.RETR_EXTERNAL,cv2.CHAIN_APPROX_SIMPLE)
cv2.drawContours(su_contour_1, su_contour,-1,(0,255,0),3)
black_img = np.zeros((450,450,3), e.g. uint8)
su_biggest, su_maxArea = main_outline(su_contour)
if su_biggest.size != 0:
su_biggest = reframe(su_biggest)
cv2.drawContours(su_contour_2,su_biggest,-1, (0,255,0),10)
su_pts1 = np.float32(su_biggest)
su_pts2 = np.float32([[0,0],[450,0],[0,450],[450,450]])
su_matrix = cv2.getPerspectiveTransform(su_pts1, su_pts2)
su_imagewrap = cv2.warpPerspective(puzzle,su_matrix,(450,450))
su_imagewrap =cv2.cvtColor(su_imagewrap, cv2.COLOR_BGR2GRAY)
plt.figure()
plt.imshow(su_imagewrap)
plt.show()
DIVIDE THE CELLS AND CLASSIFY THE DIGITS
In this section, let's divide the cells and classify the digits.
- First divide the Sudoku into 81 cells with empty digits or spaces
- Clipping the cells
- Use the model to rank the digits in the cells so that empty cells are sorted as zero
- Finally, detect the output in an array of 81 digits.
sudoku_cell = splitcells(su_imagewrap)
#Let's have alook at the last cell
plt.figure()
plt.imshow(sudoku_cell[58])
plt.show()
def CropCell(cells):
Cells_croped = []
    for image in cells:
img = np.array(image)
img = img[4:46, 6:46]
img = Image.fromarray(img)
Cells_croped.append(img)
    return Cells_croped
sudoku_cell_croped= CropCell(sudoku_cell)
#Let's have alook at the last cell
plt.figure()
plt.imshow(sudoku_cell_croped[58])
plt.show()
Part 3: SOLVE THE SODOKU
In this section we are going to perform two operations:
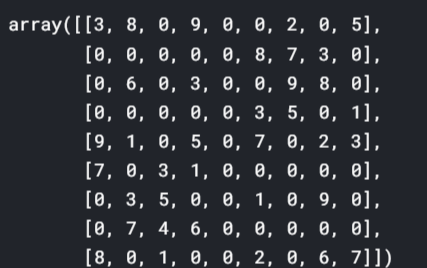
- Remodeling the matrix into a matrix of 9 x 9
- Solve the array using recursion
# Reshaping the grid to a 9x9 matrix
grid = np.reshape(grid,(9,9))
grid
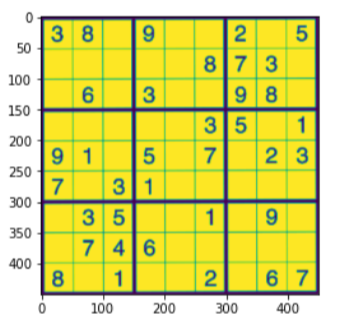
#For compairing
plt.figure()
plt.imshow(su_imagewrap)
plt.show()
Check the following code to further solve the sudoku:
def next_box(quiz):
    for row in range(9):
        for col in range(9):
            if quiz[row][col] == 0:
                return (row, col)
    return False
#Function to fill in the possible values by evaluating rows collumns and smaller cells
def possible (quiz,row, col, n):
    #global quiz
    for i in range (0,9):
        if quiz[row][i] == n and row != i:
            return False
    for i in range (0,9):
        if quiz[i][col] == n and col != i:
            return False
row0 = (row)//3
col0 = (col)//3
    for i in range(row0*3, row0*3 + 3):
        for j in range(col0 * 3, col0 * 3 + 3):
            if quiz[i][j]==n and (i,j) != (row, col):
                return False
    return True
#Recursion function to loop over untill a valid answer is found.
def solve(quiz):
val = next_box(quiz)
    if val is False:
        return True
    else:
row, col = val
        for n in range(1,10): #n is the possible solution
            if possible(quiz,row, col, n):
quiz[row][col]=n
                if solve(quiz):
                    return True
                else:
quiz[row][col]=0
        return
def Solved(quiz):
    for row in range(9):
        if row % 3 == 0 and row != 0:
print("....................")
        for col in range(9):
            if col % 3 == 0 and col != 0:
print("|", end=" ")
            if col == 8:
print(quiz[row][col])
            else:
print(str(quiz[row][col]) + " ", end="")
solve(grid)

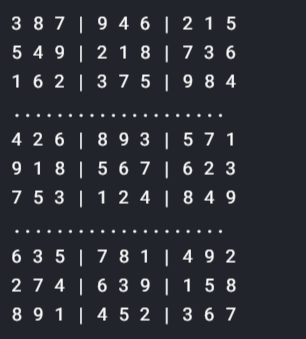
Check the following code to get the final result:
if solve(grid):
Solved(grid)
else:
print("Solution don't exist. Model misread digits.")
¡¡Viva!! Hemos terminado con la resolutionThe "resolution" refers to the ability to make firm decisions and meet set goals. In personal and professional contexts, It involves defining clear goals and developing an action plan to achieve them. Resolution is critical to personal growth and success in various areas of life, as it allows you to overcome obstacles and keep your focus on what really matters.... de sudoku mediante el deep learningDeep learning, A subdiscipline of artificial intelligence, relies on artificial neural networks to analyze and process large volumes of data. This technique allows machines to learn patterns and perform complex tasks, such as speech recognition and computer vision. Its ability to continuously improve as more data is provided to it makes it a key tool in various industries, from health.... If you want more information, see links below:
https://www.youtube.com/watch?v=G_UYXzGuqvM
https://www.kaggle.com/yashchoudhary/deep-sudoku-solver-multiple-approaches
https://www.youtube.com/watch?v = QR66rMS_ZfA
Final notes
Then, in this article, we had a detailed discussion about Solve Sudoku using deep learning. Hope you learn something from this blog and help you in the future. Thanks for reading and your patience. Good luck!
You can check my articles here: Articles
Email identification: [email protected]
Connect with me on LinkedIn: LinkedIn.
The media shown in this article is not the property of DataPeaker and is used at the author's discretion.





