This article was published as part of the Data Science Blogathon
Introduction
Apache Spark is a framework used in cluster computing environments to analyze big data. Apache Spark can work in a distributed environment on a group of computers in a cluster to more effectively process large data sets. This open source Spark engine supports a wide range of programming languages, including Scala, Java, R y Python.
In this article, I will show you how to start installing Pyspark on your Ubuntu machine and then build a basic ETL pipeline to extract transfer load data from a remote RDBMS system to a AWS S3 Bucket.
This ETL architecture can be used to transfer hundreds of Gigabytes of data from any RDBMS database server. (in this article we have used MS SQL Server) has an Amazon S3 bucket.
Key benefits of using Apache Spark:
- Run workloads 100 times faster than Hadoop
- Java compatible, Scala, Python, R y SQL
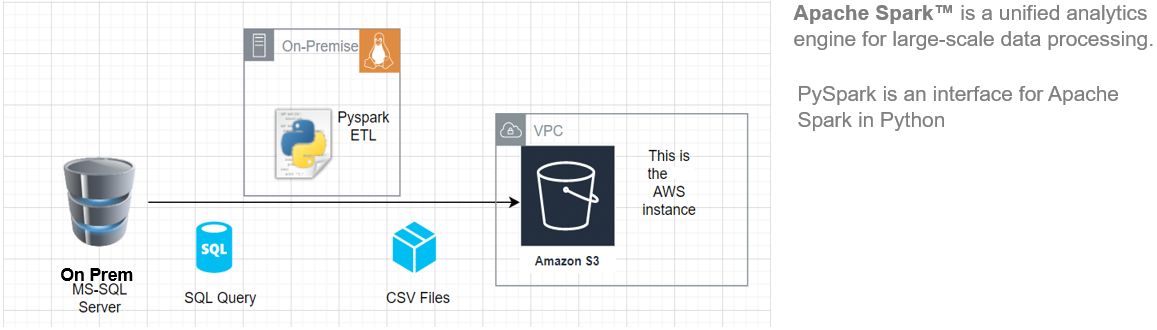
Source: This is an original image.
Requirements
To start, we must have the following prerequisites:
- A system running Ubuntu 18.04 o Ubuntu 20.04
- A user account with sudo privileges
- An AWS account with upload access to the S3 bucket
Before downloading and configuring Spark, you must install the necessary package dependencies. Make sure the following packages are already configured on your system.
To confirm the installed dependencies by running these commands:
java -version; git --version; python --version

Install PySpark
Download the version of Spark you want from the official Apache website. We will download Spark 3.0.3 con Hadoop 2.7 since it is the current version. Then, use wget command and direct url to download Spark package.
Change your working directory to / opt / spark.
cd /opt/spark
sudo wget https://downloads.apache.org/spark/spark-3.0.3/spark-3.0.3-bin-hadoop2.7.tgz

Extract the saved package using the tar command. Once the spreading process is complete, the output shows the files that have been unzipped from the archive.
tar xvf spark-*
ls -lrt spark-*

Set up the Spark environment
Before starting a Spark server, we need to set some environment variables. There are some Spark directories that we need to add to the default profile. Use the vi editor or any other editor to add these three lines to .profile:
vi ~ / .profile
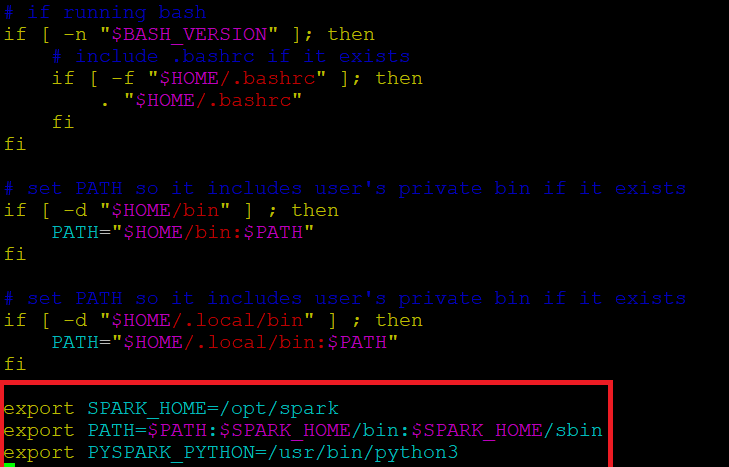
Insert these 3 lines at the end of the .profile file.
export SPARK_HOME=/opt/spark
export PATH=$PATH:$SPARK_HOME/bin:$SPARK_HOME/sbin
export PYSPARK_PYTHON=/usr/bin/python3
Save the changes and exit the editor. When you finish editing the file, load the .profile file on the command line by typing. Alternatively, we can exit the server and log back in for the changes to take effect.
source ~/.profile
Start / Stop Spark Master & Worker
Go to the Spark installation directory / opt / spark / spark *. It has all the necessary scripts to start / stop Spark services.
Run this command to start Spark Master.
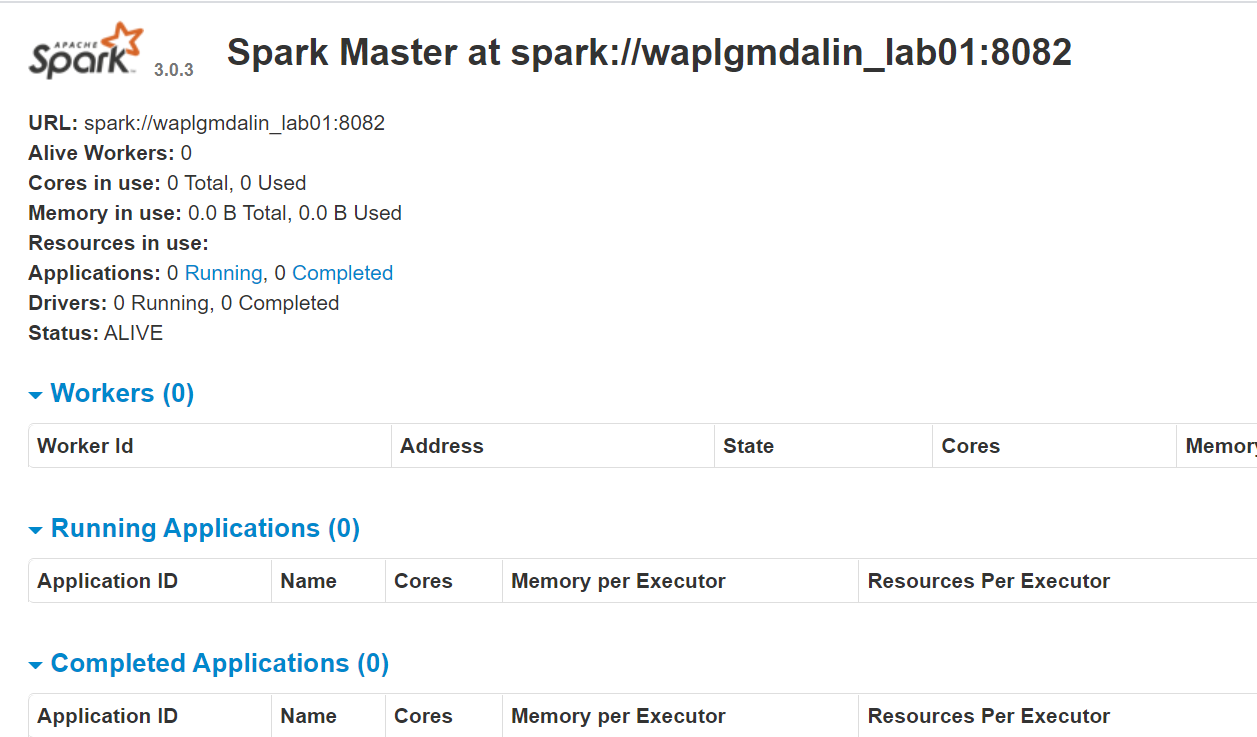
start-master.shTo view the Spark web interface, open a web browser and enter the IP address of the local host in the port 8080. (This is the default port that Spark uses if you need to change it, do it in the start-master.sh script). Alternatively, can replace 127.0.0.1 with the actual network IP address of your host machine.
http://127.0.0.1:8080/The web page shows the Spark Master URL, worker nodes, CPU resource utilization, the memory, running applications, etc.
Now, run this command to start a Spark worker instance.
start-slave.sh spark://0.0.0.0:8082
O
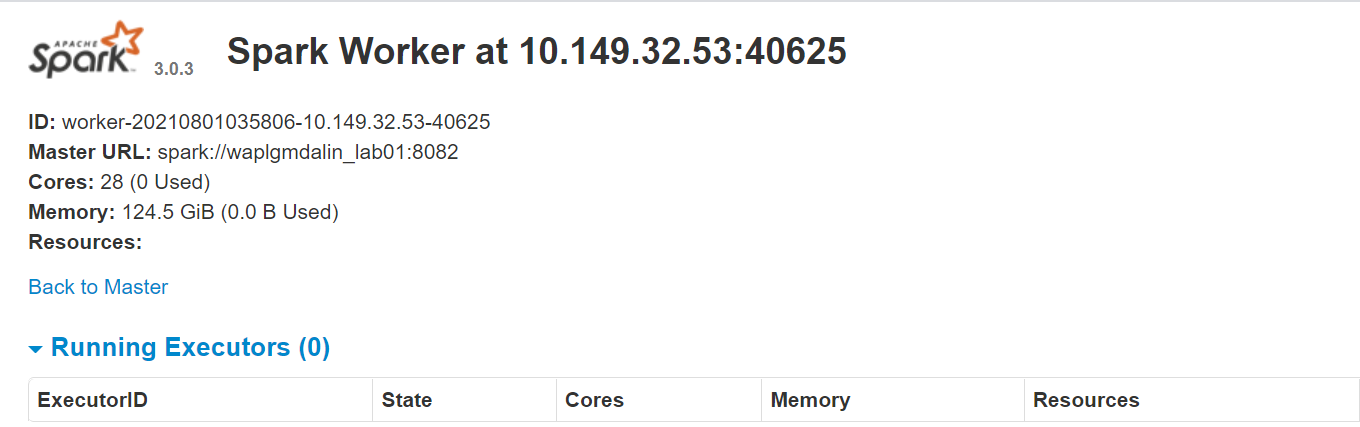
start-slave.sh spark://waplgmdalin_lab01:8082
The worker's own website runs on http://127.0.0.1:8084/ but it must be linked to the teacher. This is why we pass the Spark master url as a parameter to the start-slave.sh script. To confirm if the worker is correctly linked to the master, open the link in a browser.
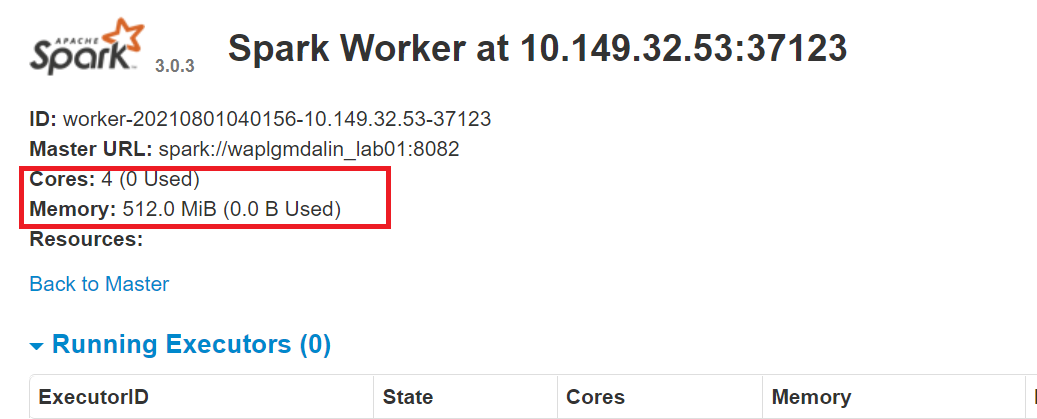
Assigning Resources to the Spark Worker
By default, when you start a worker instance, uses all available cores on the machine. But nevertheless, for practical reasons, you may want to limit the number of cores and the amount of RAM allocated to each worker.
start-slave.sh spark://0.0.0.0:8082 -c 4 -m 512M
Here, we have assigned 4 cores Y 512 MB RAM to worker. Let's confirm this by restarting the worker instance.
To stop the master instance started by running the above script, run:
stop-master.shTo stop a running worker process, enter this command:
stop-slave.shConfigure MS SQL connection
In this PySpark ETL, we will connect to an MS SQL server instance as source system and run SQL queries to get data. Then, first we have to download the necessary dependencies.
Download the MS-SQL jar file (mssql-jdbc-9.2.1.jre8) from the Microsoft website and copy it to the directory “/ opt / spark / jars”.
https://www.microsoft.com/en-us/download/details.aspx?id=11774
Download the Spark SQL jar file (chispa-sql_2.12-3.0.3.jar) from the Apache download site and copy it to the ‘/ opt directory / spark / jars ”.
https://jar-download.com/?search_box=org.apache.spark+spark.sql
Edit the .profile, add PySpark and Py4J classes to Python path:
export PYTHONPATH=$SPARK_HOME/python/:$PYTHONPATH
export PYTHONPATH=$SPARK_HOME/python/lib/py4j-0.10.9-src.zip:$PYTHONPATH
Configure the AWS S3 connection
To connect to an AWS instance, we need to download the three jar files and copy them to the directory “/ opt / spark / jars”. Check the version of Hadoop you are currently using. You can get it from any jar present in your Spark installation. If the Hadoop version is 2.7.4, download the jar file for the same version. Para Java SDK, you must download the same version that was used to generate the Hadoop-aws package.
Make sure the versions are the latest.
- hadoop-aws-2.7.4.jar
- aws-java-sdk-1.7.4.jar
- jets3t-0.9.4.jar
sudo wget https://repo1.maven.org/maven2/com/amazonaws/aws-java-sdk/1.11.30/aws-java-sdk-1.7.4.jar
sudo wget https://repo1.maven.org/maven2/org/apache/hadoop/hadoop-aws/2.7.3/hadoop-aws-2.7.4.jar
sudo wget https://repo1.maven.org/maven2/net/java/dev/jets3t/jets3t/0.9.4/jets3t-0.9.4.jar
Python development
Create a working directory called 'scripts’ to store all python scripts and configuration files. Create a file called “sqlfile.py” which will contain the SQL queries that we want to execute on the remote database server.
vi sqlfile.py
Insert the following SQL query in the sqlfile.py file which will extract the data. Before this step, it is recommended to test run this SQL query on the server to get an idea of the number of records returned.
query1 = """(select * from sales-data where date >= '2021-01-01' and status="Completed")"""
Save and exit the file.
Create a configuration file called “config.ini” which will store login credentials and database parameters.
vi config.ini
Insert the following AWS and MSSQL connection parameters in the file. Note that we have created separate sections to store the AWS and MSSQL connection parameters. You can create as many DB connection instances as required, as long as each one is kept in its own section (mssql1, mssql2, aws1, aws2, etc.).
[aws]
ACCESS_KEY=BBIYYTU6L4U47BGGG&^CF
SECRET_KEY=Uy76BBJabczF7h6vv+BFssqTVLDVkKYN/f31puYHtG
BUCKET_NAME=s3-bucket-name
DIRECTORY=sales-data-directory

[mssql]
url = jdbc:sqlserver://PPOP24888S08YTA.APAC.PAD.COMPANY-DSN.COM:1433;databaseName=Transactions
database = Transactions
user = MSSQL-USER
password = MSSQL-Password
dbtable = sales-data
filename = data_extract.csv
Save and exit the file.
Create a Python script called “Data-Extraction.py”.
Import libraries for Spark and Boto3
Spark is implemented in Scala, a language that runs in the JVM, but since we are working with Python we will use PySpark. The current version of PySpark is 2.4.3 and it works with python 2.7, 3.3 and higher. You can think of PySpark as a Python based container on top of the Scala API.
Here, AWS SDK for Python (Boto3) to create, configure and manage AWS services, such as Amazon EC2 and Amazon S3. The SDK provides an object-oriented API, as well as low-level access to AWS services.
Import the Python libraries to start a Spark session, query1 from sqlfile.py and boto3.
from pyspark.sql import SparkSession
import shutil
import os
import glob
import boto3
from sqlfile import query1
from configparser import ConfigParser
Create a SparkSession
SparkSession provides a single entry point to interact with the underlying Spark engine and enables Spark programming with DataFrame and Dataset APIs. Most importantly, it restricts the number of concepts and builds a developer has to work with while interacting with Spark.. In this point, you can use the ‘Spark – spark’ variable as your instance object to access your public methods and instances for the duration of your Spark job. Give the app a name.
appName = "PySpark ETL Example - via MS-SQL JDBC"
master = "local"
spark = SparkSession
    .builder
    .master(master)
    .appName(appName)
    .config("spark.driver.extraClassPath","/opt/spark/jars/mssql-jdbc-9.2.1.jre8.jar")
    .getOrCreate()
Read the configuration file
We have stored the parameters in a file “config.ini” to separate static parameters from Python code. This helps to write cleaner code without any coding. Este module implements a basic configuration language that provides a structure similar to what we see in Microsoft Windows .ini files.
url = config.get('mssql-onprem', 'url')
user = config.get('mssql-onprem', 'user')
password  = config.get('mssql-onprem', 'password')
dbtable =  config.get('mssql-onprem', 'dbtable')
filename =  config.get('mssql-onprem', 'filename')
ACCESS_KEY=config.get('aws', 'ACCESS_KEY')

SECRET_KEY=config.get('aws', 'SECRET_KEY')

BUCKET_NAME=config.get('aws', 'BUCKET_NAME')

DIRECTORY=config.get('aws', 'DIRECTORY')
Run data extraction
Spark includes a data source that can read data from other databases using JDBC. Run SQL on the remote database connecting using Microsoft SQL Server JDBC driver and connection parameters. In option “query”, if you want to read a whole table, provide the table name; on the contrary, if you want to run the select query, specify the same. The data returned by SQL is stored in a Spark data frame.
jdbcDF = spark.read.format("jdbc")
    .option("url", url)
    .option("query", query2)
    .option("user", user)
    .option("password", password)
    .option("driver", "com.microsoft.sqlserver.jdbc.SQLServerDriver")
    .load()
jdbcDF.show(5)
Save data frame as CSV file
The data frame can be stored on the server as a file. Archivo CSV. Something, this step is optional in case you want to write the data frame directly to an S3 bucket, this step can be skipped. PySpark, default, create multiple partitions, to avoid this we can save it as a single file using the coalesce function (1). Then, we move the file to the designated output folder. Optionally, remove created output directory if you just want to save dataframe to S3 bucket.
path="output"
jdbcDF.coalesce(1).write.option("header","true").option("sep",",").mode("overwrite").csv(path)
shutil.move(glob.glob(os.getcwd() + '/' + path + '/' + r '*. csv')[0], os.getcwd()+ '/' + filename )
shutil.rmtree(os.getcwd() + '/' + path)
Copy data frame to bucket S3
First, create a 'boto3 session’ using AWS access and secret key values. Retrieve the values from the S3 bucket and subdirectory where you want to upload the file. the Upload file() accepts a file name, a bucket name and an object name. The method handles large files by dividing them into smaller chunks and loading each chunk in parallel.
session = boto3.Session(
    aws_access_key_id=ACCESS_KEY,
    aws_secret_access_key=SECRET_KEY,
)
bucket_name=BUCKET_NAME
s3_output_key=DIRECTORY + filename
s3 = session.resource('s3')
# Filename - File to upload
# Bucket - Bucket to upload to (the top level directory under AWS S3)
# Key - S3 object name (can contain subdirectories). If not specified then file_name is used
s3.meta.client.upload_file(Filename=filename, Bucket=bucket_name, Key=s3_output_key)
Cleaning files
After uploading the file to the S3 bucket, delete any files left on the server; on the contrary, I threw an error.
if os.path.isfile(filename):
    removes(filename)
else:
    print("Error: %s file not found" % filename)
Conclution
Apache Spark is an open source cluster computing framework with in-memory processing capabilities. It was developed in the Scala programming language. Spark offers many features and capabilities that make it an efficient Big Data framework. Performance and speed are the main benefits of Spark. You can load the terabytes of data and process it smoothly by setting up a multi-node cluster. This article gives an idea of how to write a Python-based ETL.
The media shown in this article is not the property of DataPeaker and is used at the author's discretion.


