
This article was published as part of the Data Science Blogathon
The name is inspired by MPEG, que significa Moving Picture Expert Group. FF stands for Fast Forward. The MPEG group is the alliance of working groups behind the establishment of many of today's essential video standards., including MP4 format, with which we are all familiar.
Results
- What is FFmpeg?
- Why do people use FFmpeg?
- How to configure FFmpeg in Windows, Ubuntu and macOS.
- Libraries are available from FFmpeg for media manipulations.
- Tools that FFmpeg comes with for command line applications.
- Usage and examples for FFprobe and FFplay.
Why do people use FFmpeg?
It is often referred to as the Swiss army knife of media transcoding or streaming.. We can use FFmpeg to perform many functions. The code is written in C language and optimized for better performance. Its commands are simple to execute. Once you are familiar with the concepts, it is very flexible for all the filters and options that you can use to suit your needs.
FFmpeg supports a wide range of codes, formats, devices and protocols, making it an ideal choice as a transcoding engine. Unlike many discontinued projects, is still in active development for more than 20 years. There is a large community of developers, users and contributors constantly developing new features and fixes.
FFmpeg has been used in central processing for video platforms such as YouTube and iTunes. Most of us use a media player like VLC to play video files. VLC uses FFmpeg libraries as its core. Some video editors and mobile apps also use FFmpeg under the hood.
Setting up FFmpeg on Windows, Ubuntu and macOS
There are a few things to know before setting up FFmpeg. There is no official build for any operating system. But it is an open source project, which you can get from the FFmpeg source code on the internet. Therefore, you can choose to create it yourself from source code. You can download a snapshot of the current source code here or make a payment from your git repository and follow the instructions to compile it on your machine. This can be a bit complex and time consuming and may require you to understand and choose some configuration options. It may also be necessary to install additional tools and compilers at the beginning. Then, unless you have a good reason to build it yourself, you may not want to go this route.
Instead, you can choose to download and install a pre-compiled FFmpeg package for your operating system. There are two ways to configure these precompiled binaries. If you have a package manager like APT on Ubuntu and Homebrew on macOS, it is easier to use as it takes care of downloading FFmpeg and its dependencies.
Let's keep things as simple as possible and choose the simplest way to start. The procedures below show how you can configure using precompiled packages.
Mac OS
On macOS, the easiest way to install FFmpeg is through Homebrew. Make sure you have installed Homebrew on your macOS, or you can continue this tutorial on how to install Homebrew.
We are using macOS 11.4 in this case.
- Open Terminal and type
brew — version. You should see the prep version printed in Terminal if Homebrew installed successfully.

- For macOS in x86 architecture, use command
brew install ffmpegwhile for M1 please use the commandaarch arm64 brew install ffmpeg.
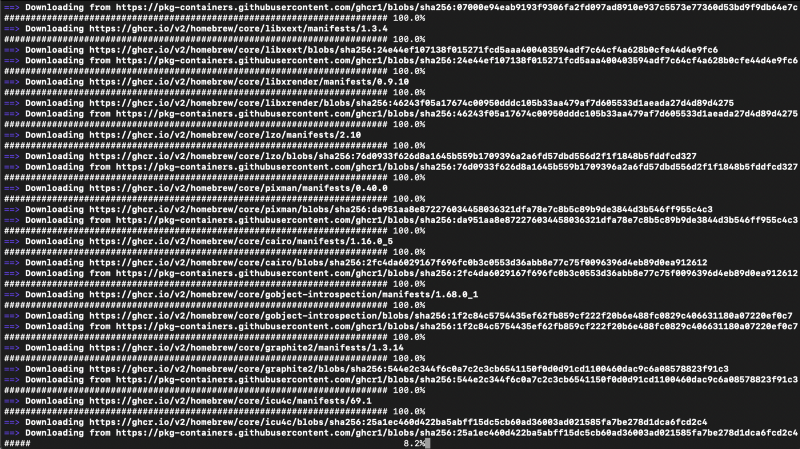
- After the installation is complete, you can type
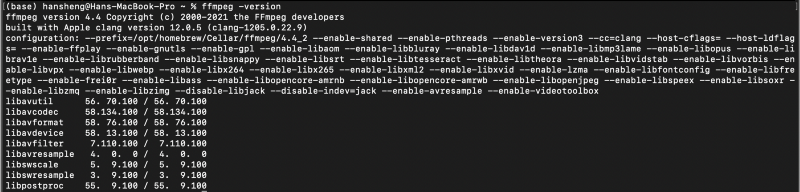
ffmpeg -versionin Terminal. If the FFmpeg version is printed, it means that FFmpeg installed successfully.
Windows
Unlike APT on Ubuntu and Homebrew on macOS, there is no known package manager in Windows, that you can use to quickly install FFmpeg. For Windows, you need to disable it and configure it manually.
There is 4 Windows FFmpeg build variants available that can be found here:
git full– built from a master branch with a large set of libraries.git essentials– built from a master branch with commonly used libraries.release full– built from the latest branch of the release with a large set of libraries.release essentials– built from the latest branch of the release with commonly used libraries.
We will use FFmpeg release essentials in our case.
- Download the basics of the FFmpeg version here.
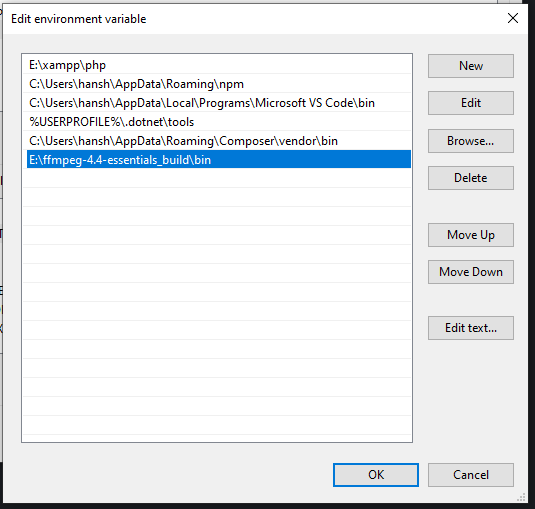
- Extract the files to a place from where you will use them in the future. In my case, I put them on my E Drive.
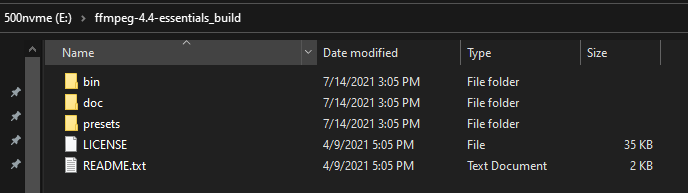
- Within compartment The folder contains the executables we want.
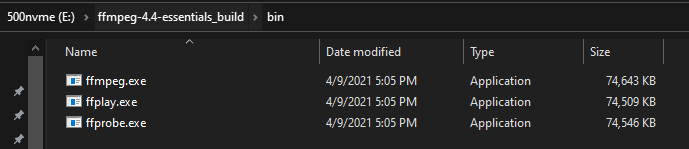
- Add compartment folder a VariableIn statistics and mathematics, a "variable" is a symbol that represents a value that can change or vary. There are different types of variables, and qualitative, that describe non-numerical characteristics, and quantitative, representing numerical quantities. Variables are fundamental in experiments and studies, since they allow the analysis of relationships and patterns between different elements, facilitating the understanding of complex phenomena.... Windows environment path so we can run this tool without having to specify the full path every time. Look for Environment Variables in the search bar and click Environment Variables…
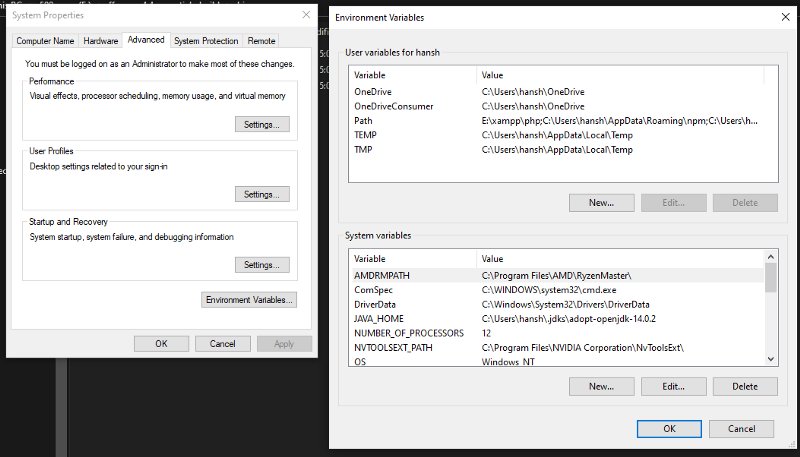
- Click on Path in User variable, click New, and paste the full path of the compartment file.
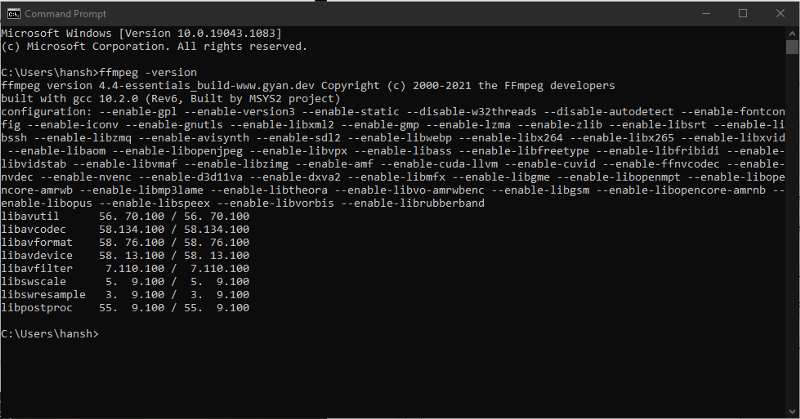
- Opened Command prompt and type
ffmpeg -version. If you see that the version of FFmpeg is printed, it means that FFmpeg installed successfully. We can also checkffprob -versionYffplay -version.
FFmpeg Libraries
FFmpeg has several valuable libraries that you can use directly from your application code. Each library contains different functions related to a particular area.
Some of the famous libraries are:
- libavcodec: contains all encoders and decoders that FFmpeg supports.
- libavformat: has all muxers and demuxers to work with various container formats.
- libavfilter: It consists of many filters that you can use to modify the audio or video according to the requirements.
- libavdevice: supports several different input and output devices.
- libavutil: aids portable multimedia programming.
- libswscale: performs highly optimized image scaling and color space and pixel format conversion operations.
- libswresample: performs resampling operations, highly optimized audio sample format remixing and conversion.
FFmpeg tools
In addition to libraries that libraries can use from other applications, the FFmpeg package contains some tools on its own.
Some of the tools are:
- FFmpeg: main transcoding engine. Often invoked from a command line or other process.
- ffplay: a minimal tool for playing audio or video.
- ffprobe: quick media inspection to extract valuable information, like how many streams are there in the media, the frame rate of a video, etc.
Examples and use of FFprobe
Use
ffprobe [OPTIONS] [INPUT_FILE]
man ffprobe– See the manual.ffprobe -h– Sample help included.-v error– Hide records unless there is an error.-show_format– Show video metadata formatted using Tag.show_streams– Shows all streams in the archive (both video and audio).-print_format—Print metadata in a specific format (CSV / XML / JSONJSON, o JavaScript Object Notation, It is a lightweight data exchange format that is easy for humans to read and write, and easy for machines to analyze and generate. It is commonly used in web applications to send and receive information between a server and a client. Its structure is based on key-value pairs, making it versatile and widely adopted in software development..).-select_streams
The media shown in this article is not the property of DataPeaker and is used at the author's discretion.





