Introduction
"If you speak to a man in a language he understands, it goes to his head. If you speak to him in his own language, will reach your heart “. – Nelson Mandela
The beauty of language transcends borders and cultures. Learning a language other than our mother tongue is a great advantage. But the road to bilingualism, or multilingualism, it can often be long and endless.
There are so many little nuances that we get lost in the sea of words. But nevertheless, things have become a lot easier with online translation services (I'm looking at Google Translate!).
I have always wanted to learn a language other than English. I tried to learn german (o German) in 2014. It was fun and challenging. I finally had to give up, but I harbored the desire to start over.

Fast forward to 2019, I am lucky to be able to build a language translator for any possible language pair. What a great benefit natural language processing has been!!
In this article, We will discuss the steps to create a German to English language translation model using Keras. We'll also take a quick look at the history of machine translation systems with the benefit of hindsight..
This article assumes familiarity with RNN, LSTM and Keras. Below are a couple of articles to read more about them:
Table of Contents
- Automatic translation: a brief history
- Understanding the problem statement
- Introduction to sequence-by-sequence prediction
- Implementation in Python using Keras
Automatic translation: a brief history
Most of us were introduced to machine translation when Google introduced the service. But the concept has been around since the middle of the last century.
Research work in machine translation (MT) started already in the decade of 1950, mainly in the United States. These early systems were based on huge bilingual dictionaries, hand-coded rules and universal principles underlying natural language.
In 1954, IBM made a first public demonstration of a machine translation. The system had a fairly small vocabulary of only 250 words and could translate only 49 selected Russian sentences into English. The number seems tiny now, but the system is widely regarded as an important milestone in the progress of machine translation.
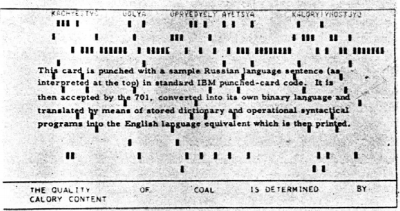
This image has been taken from research work describing the IBM system
Two schools of thought soon emerged:
- Empirical Trial and Error Approaches, using statistical methods, Y
- Theoretical Approaches Involving Fundamental Linguistic Research
In 1964, the United States government established the Automatic Language Processing Advisory Committee (ALPAC) to evaluate the progress of machine translation. ALPAC insisted a bit and published a report in November 1966 on MT status. Below are the highlights of that report:
- He raised serious doubts about the feasibility of machine translation, calling it desperate.
- Funding for TM research was discouraged
- It was quite a depressing report for researchers working in this field..
- Most of them left the field and started new careers.
Not exactly an enthusiastic recommendation!!
A long period of drought followed this unfortunate report. Finally, in 1981, a new system called WEATHER system deployed in Canada for the translation of the weather forecasts published in French into English. It was a fairly successful project that remained in operation until 2001.
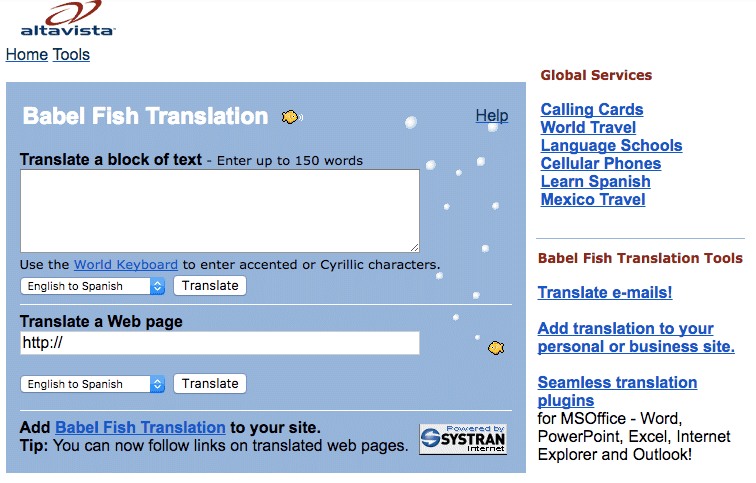
The world's first web translation tool, Babel fish, was launched by the AltaVista search engine at 1997.
And then came the breakthrough we're all familiar with now: Google Translate. Since then, has changed the way we work (and we even learned) with different languages.
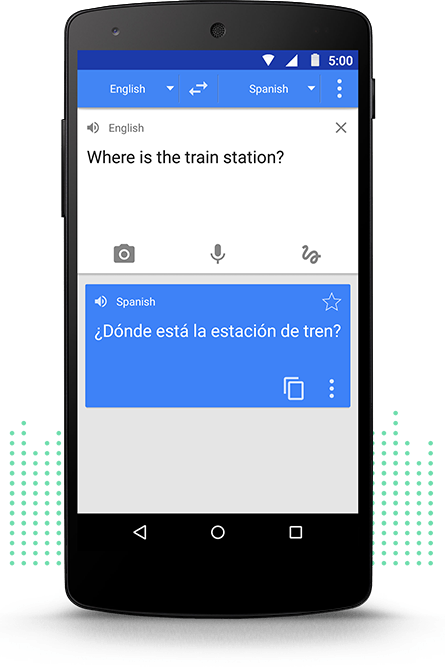
Source: translate.google.com
Understanding the problem statement
Let's go back to where we left off in the introduction section, namely, To learn german. But nevertheless, this time i'm going to make my machine do this task. The goal is to convert a German sentence into its English counterpart using a neural machine translation system. (NMT).

We will use data from German-English sentence pairs from http://www.manythings.org/anki/. You can download it from here.
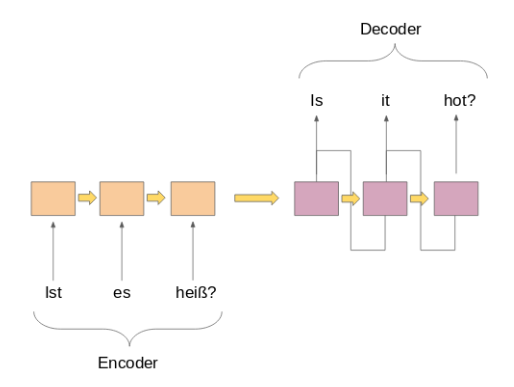
Introduction to sequence-by-sequence modeling (Seq2Seq)
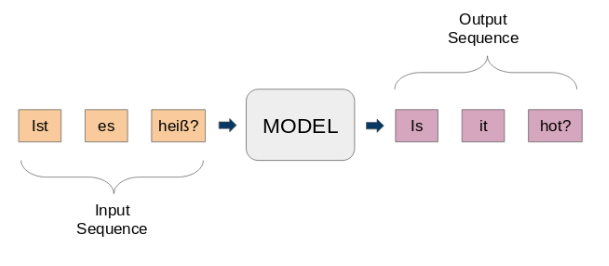
Sequence-to-sequence models (seq2seq) are used for a variety of NLP tasks, as a text summary, speech recognition, DNA sequence modeling, among other. Our goal is to translate given phrases from one language to another.
Here, both input and output are phrases. In other words, these sentences are a sequence of words that go in and out of a pattern. This is the basic idea of sequence-by-sequence modeling.. The following figure tries to explain this method.
A typical seq2seq model has 2 main components:
a) an encoder
b) a decoder
Both parts are essentially two different models of recurrent neural networks (RNN) combined in a giant network:
I've listed some important use cases of sequence-by-sequence modeling below (apart from machine translation, of course):
- Speech recognition
- Entity extraction / subject name to identify the main topic of a body of text
- Relationship classification to label relationships between multiple entities labeled in the previous step
- Chatbot skills to have conversational skills and interact with customers
- Text summary to generate a concise summary of a large amount of text
- Question response systems
Implementation in Python using Keras
Time to get our hands dirty! There is no better feeling than learning a topic by seeing the results first-hand.. We will start our favorite Python environment (Jupyter Notebook for me) and we will get to work.
Import the required libraries
import string
import re
from numpy import array, argmax, random, take
import pandas as pd
from keras.models import Sequential
from keras.layers import Dense, LSTM, Embedding, RepeatVector
from keras.preprocessing.text import Tokenizer
from keras.callbacks import ModelCheckpoint
from keras.preprocessing.sequence import pad_sequences
from keras.models import load_model
from keras import optimizers
import matplotlib.pyplot as plt
%matplotlib inline
pd.set_option('display.max_colwidth', 200)
Read the data in our IDE
Our data is a text file (.txt) English-German sentence pairs. First, we will read the file using the function defined below.
# function to read raw text file
def read_text(filename):
        # open the file
        file = open(filename, mode="rt", encoding='utf-8')

        # read all text
        text = file.read()
        file.close()
        return text
Let's define another function to divide the text into English-German pairs separated by ‘ n’. Later, we will divide these pairs into English sentences and German sentences, respectively.
# split a text into sentences
def to_lines(text):
      sents = text.strip().split('n')
      sents = [i.split('t') for i in sents]
      return sents
Now we can use these functions to read the text in an array in our desired format.
data = read_text("deu.txt")
deu_eng = to_lines(data)
deu_eng = array(deu_eng)
The actual data contains more than 150.000 sentence pairs. But nevertheless, we will use only the first 50,000 sentence pairs to reduce model training time. You can change this number according to the computing power of your system (Or if you feel lucky!).
deu_eng = deu_eng[:50000,:]
Text preprocessing
A very important step in any project, especially in NLP. The data we work with is often unstructured, so there are certain things we need to take care of before moving on to the building part of the model.
(a) Text cleaning
Let's take a look at our data first. This will help us decide which preprocessing steps to take.
deu_eng
array([['Hi.', 'Hello!'],
     ['Hi.', 'Good day!'],
     ['Run!', 'Run!'],
     ...,
     ['Mary has very long hair.', 'Maria has very long hair.'],
     ["Mary is Tom's secretary.", 'Maria is Tom's secretary.'],
     ['Mary is a married woman.', 'Maria is a married woman.']],
     dtype="<U380")
We will get rid of the punctuation marks and then convert all the text to lowercase.
# Remove punctuation
deu_eng[:,0] = [s.translate(p.maketrans('', '', string.punctuation)) for s in deu_eng[:,0]]
deu_eng[:,1] = [s.translate(p.maketrans('', '', string.punctuation)) for s in deu_eng[:,1]]

deu_eng
array([['Hi', 'Hello'],
     ['Hi', 'Good day'],
     ['Run', 'Run'],
     ...,
     ['Mary has very long hair', 'Maria has very long hair'],
     ['Mary is Toms secretary', 'Maria is Tom's secretary'],
     ['Mary is a married woman', 'Maria is a married woman']],
     dtype="<U380")
# convert text to lowercase
for i in range(len(deu_eng)):
    deu_eng[i,0] = deu_eng[i,0].lower()
    deu_eng[i,1] = deu_eng[i,1].lower()

deu_eng
array([['hi', 'Hello'],
     ['hi', 'Good day'],
     ['run', 'run'],
     ...,
     ['mary has very long hair', 'Maria has very long hair'],
     ['mary is toms secretary', 'Maria is Tom's secretary'],
     ['mary is a married woman', 'Maria is a married woman']],
     dtype="<U380")
(b) Text to sequence conversion
A Seq2Seq model requires that we convert both input and output sentences into fixed-length integer sequences.
But before doing that, let's visualize the length of the sentences. We will capture the length of all sentences in two separate lists for English and German, respectively.
# empty lists
eng_l = []
deu_l = []

# populate the lists with sentence lengths
for i in deu_eng[:,0]:
      eng_l.append(len(i.split()))

for i in deu_eng[:,1]:
      deu_l.append(len(i.split()))

length_df = pd.DataFrame({'eng':eng_l, 'it gave':deu_l})

length_df.hist(bins = 30)
plt.show()
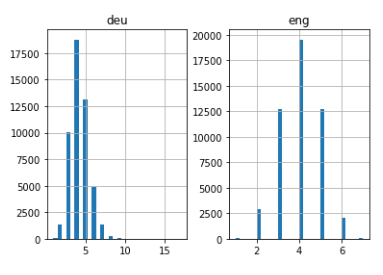
Quite intuitive: the maximum length of sentences in German is 11 and that of the phrases in English is 8.
Then, vectorize our text data by using Keras Tokenizador () class. It will convert our sentences into sequences of integers. Then we can pad those sequences with zeros to make all the sequences the same length.
Please note that we will prepare tokenizers for the sentences in German and English:
# function to build a tokenizer
def tokenization(lines):
      tokenizer = Tokenizer()
      tokenizer.fit_on_texts(lines)
      return tokenizer
# prepare english tokenizer
eng_tokenizer = tokenization(deu_eng[:, 0])
eng_vocab_size = len(eng_tokenizer.word_index) + 1

eng_length = 8
print('English Vocabulary Size: %d' % eng_vocab_size)
English Vocabulary Size: 6453
# prepare Deutch tokenizer
deu_tokenizer = tokenization(deu_eng[:, 1])
deu_vocab_size = len(deu_tokenizer.word_index) + 1

deu_length = 8
print('Deutch Vocabulary Size: %d' % deu_vocab_size)
Deutch Vocabulary Size: 10998
The following code block contains a function to prepare the sequences. It will also perform sequence padding up to a maximum sentence length as mentioned above.
# encode and pad sequences
def encode_sequences(tokenizer, length, lines):
         # integer encode sequences
         seq = tokenizer.texts_to_sequences(lines)
         # pad sequences with 0 values
         seq = pad_sequences(seq, maxlen=length, padding='post')
         return seq
Construction of the model
Now we will divide the data into train and test set for model training and evaluation, respectively.
from sklearn.model_selection import train_test_split

# split data into train and test set
train, test = train_test_split(deu_eng, test_size=0.2, random_state = 12)
Time to code the sentences. We will code Sentences in German as input sequences Y English sentences as target sequences. This should be done for both the train and the test data sets.
# prepare training data
trainX = encode_sequences(deu_tokenizer, deu_length, train[:, 1])
trainY = encode_sequences(eng_tokenizer, eng_length, train[:, 0])

# prepare validation data
testX = encode_sequences(deu_tokenizer, deu_length, test[:, 1])
testY = encode_sequences(eng_tokenizer, eng_length, test[:, 0])
Now comes the exciting part!
We will start by defining our Seq2Seq model architecture:
- For the encoder, we will use a keying layer and an LSTM layer
- For decoder, we will use another LSTM coat followed by a dense coat

Model architecture
# build NMT model
def define_model(in_vocab,out_vocab, in_timesteps,out_timesteps,units):
      model = Sequential()
      model.add(Embedding(in_vocab, units, input_length=in_timesteps, mask_zero=True))
      model.add(LSTM(units))
      model.add(RepeatVector(out_timesteps))
      model.add(LSTM(units, return_sequences=True))
      model.add(Dense(out_vocab, activation='softmax'))
      return model
We are using the RMSprop optimizer on this model, since it is usually a good option when working with recurrent neural networks.
# model compilation
model = define_model(deu_vocab_size, eng_vocab_size, deu_length, eng_length, 512)
rms = optimizers.RMSprop(lr=0.001)
model.compile(optimizer=rms, loss="sparse_categorical_crossentropy")
Please note that we have used ‘sparse_categorical_crossentropy'As the loss function. This is because the function allows us to use the target sequence as is, instead of the hot encoded format. Hot-coding the target sequences using such a large vocabulary could consume all the memory of our system.
We are ready to start training our model!
We will train you during 30 times and with a batch size of 512 with a validation division of the 20%. The 80% of the data will be used to train the model and the rest to evaluate it. You can change and play with these hyperparameters.
We will also use the ModelCheckpoint () function to save the model with the least loss of validation. I personally prefer this method to the early stop.
filename="model.h1.24_jan_19"
checkpoint = ModelCheckpoint(filename, monitor="val_loss", verbose=1, save_best_only=True, mode="min")

# train model
history = model.fit(trainX, trainY.reshape(trainY.shape[0], trainY.shape[1], 1),
                    epochs=30, batch_size=512, validation_split = 0.2,callbacks=[checkpoint],
                    verbose=1)
Let's compare the loss of training and the loss of validation.
plt.plot(history.history['loss'])
plt.plot(history.history['val_loss'])
plt.legend(['train','validation'])
plt.show()

As you can see in the graph above, the validation loss stopped decreasing after 20 epochs.
Finally, we can load the saved model and make predictions on the invisible data: testX.
model = load_model('model.h1.24_jan_19')
preds = model.predict_classes(testX.reshape((testX.shape[0],testX.shape[1])))
These predictions are sequences of integers. We need to convert these integers into their corresponding words. Let's define a function to do this:
def get_word(n, tokenizer):
      for word, index in tokenizer.word_index.items():
          if index == n:
              return word
      return None
Convert predictions to text (English):
preds_text = []
for i in preds:
       temp = []
       for j in range(len(i)):
            t = get_word(i[j], eng_tokenizer)
            if j > 0:
                if (t == get_word(i[j-1], eng_tokenizer)) or (t == None):
                     temp.append('')
                else:
                     temp.append             else:
                   if(t == None):
                          temp.append('')
                   else:
                          temp.append

       preds_text.append(' '.join(temp))
Let's put the original English sentences in the test data set and the predicted sentences in a data frame:
pred_df = pd.DataFrame({'actual' : test[:,0], 'predicted' : preds_text})
We can randomly print some actual instances versus the expected ones to see how our model works:
# print 15 rows randomly
pred_df.sample(15)
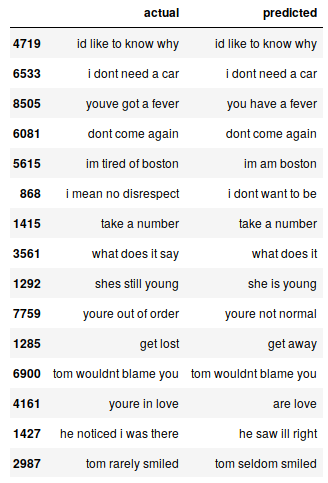
Our Seq2Seq model does a decent job. But there are several cases where you lose your understanding of keywords. For instance, it translates “i'm tired of boston” by “i'm from boston”.
These are the challenges you will face on a regular basis in NLP. But these are not immovable obstacles. We can mitigate these challenges by using more training data and building a better model. (or more complex).
You can access the complete code from this Github repository.
Final notes
Even with a very simple Seq2Seq model, the results are quite encouraging. We can easily improve this performance by using a more sophisticated codec model on a larger data set..
Another experiment I can think of is testing the seq2seq approach on a dataset that contains longer sentences. The more i experience, more you will learn about this vast and complex space.
If you have any comments on this article or have any questions / question, please share it in the comment section below.


