This article was published as part of the Data Science Blogathon
Intro
U.S, the humans, we read texts almost every minute of our life. Wouldn't it be great if our machines or systems could also read text like we do? But the most important question is “How do we make our machines read”? This is where Optical Character Recognition comes in. (OCR).
Optical character recognition (OCR)
Optical character recognition (OCR) is a technique of reading or capturing text from printed or scanned photographs, handwritten images and converting them into an editable and searchable digital format.
Applications
OCR has many applications in today's business. Some of them are listed below:
- Passport recognition at airports
- Data entry automation
- License plate recognition
- Extract business card information into a contact list
- Converting handwritten documents into electronic images
- Create searchable PDF files
- Create audible files (text to audio)
Some of the open source OCR tools are Tesseract, OCRopus.
In this article, we will focus on Tesseract OCR. And to read the images we need OpenCV.
Installing Tesseract OCR:
Download the latest installer for Windows 10 from “https://github.com/UB-Mannheim/tesseract/wiki“. Run the .exe file once it is downloaded.
Note: Don't forget to copy the software installation path from file. We will need it later as we need to add the path of the tesseract executable in the code if the installation directory is different from the default.
The typical installation path on Windows systems is C: Program files.
Then, in my case, it is “C: Program Files Tesseract-OCRtesseract.exe“.
Then, to install Python container for Tesseract, open command prompt and run command “pip instalar pytesseract“.
OpenCV
OpenCV (Open Source Computer Vision) is an open source library for image processing applications, machine learning and computer vision.
OpenCV-Python is the Python API for OpenCV.
To install it, open command prompt and run command “pip instalar opencv-python“.
Create sample OCR script
1. Read a sample image
import cv2
Read the image using the cv2.imread method () and store it in a variableIn statistics and mathematics, a "variable" is a symbol that represents a value that can change or vary. There are different types of variables, and qualitative, that describe non-numerical characteristics, and quantitative, representing numerical quantities. Variables are fundamental in experiments and studies, since they allow the analysis of relationships and patterns between different elements, facilitating the understanding of complex phenomena.... "IMG".
img = cv2.imread("image.jpg")
If required, resize image using cv2.resize method ()
img = cv2.resize(img, (400, 400))
Show the image using the cv2.imshow method ()
cv2.imshow("Image", img)
Show the window infinitely (to prevent the kernel from crashing)
cv2.waitKey(0)
Close all open windows
cv2.destroyAllWindows()
2. Chain image conversion
import pytesseract
Set path of tesseract in code
pytesseract.pytesseract.tesseract_cmd=r'C:Program FilesTesseract-OCRtesseract.exe'
The following error occurs if we do not set the path.

To convert an image to a string, use pytesseract.image_to_string (img) and save it in a variable “text”
text = pytesseract.image_to_string(img)
print the result
print(text)
Complete code:
import cv2
import pytesseract
pytesseract.pytesseract.tesseract_cmd=r'C:Program FilesTesseract-OCRtesseract.exe'
img = cv2.imread("image.jpg")
img = cv2.resize(img, (400, 450))
cv2.imshow("Image", img)
text = pytesseract.image_to_string(img)
print(text)
cv2.waitKey(0)
cv2.destroyAllWindows()
The output of the above code:
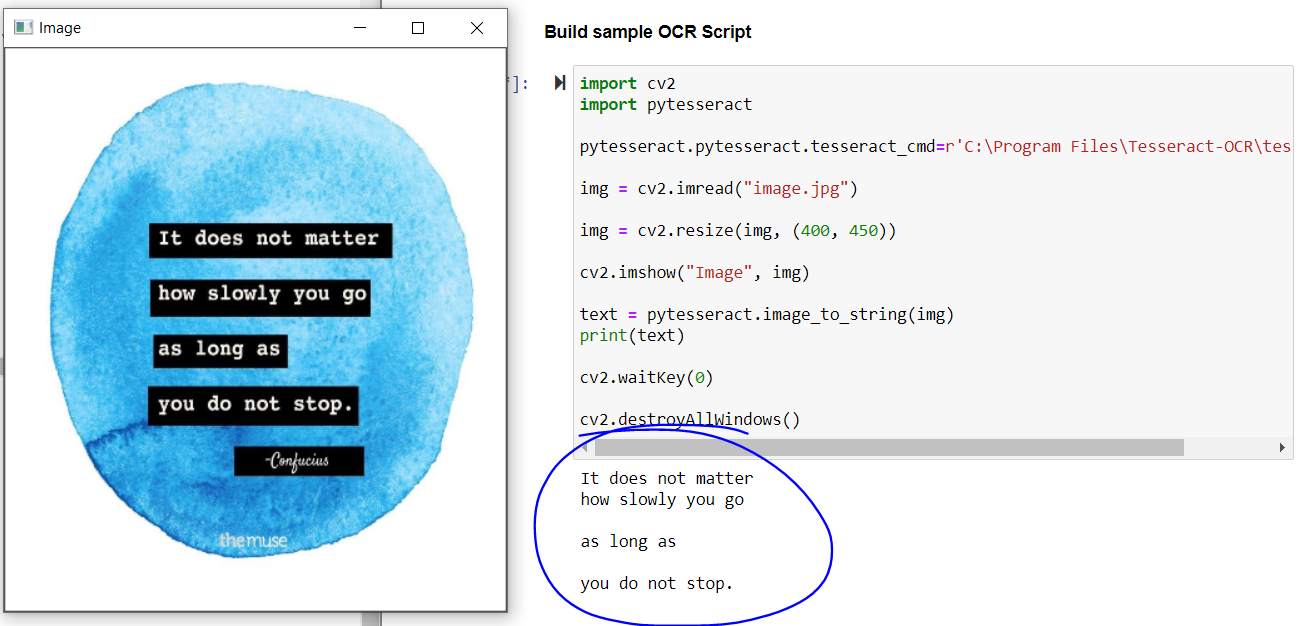
The output of the above code
If we look at the result, the main quote is perfectly extracted, but you don't get the philosopher's name and the text at the bottom of the image.
To extract text accurately and avoid precision drop, we must pre-process the image. I found this article (https://towardsdatascience.com/pre-processing-in-ocr-fc231c6035a7) quite useful. Please refer to it to better understand preprocessing techniques.
Perfect! Now that we have the required basics, let's look at some simple OCR applications.
1. Creating word clouds in review images
The word cloud is a visual representation of the frequency of words. The bigger the word appears in a word cloud, the word is most commonly used in the text.
For this, I took some Amazon review snapshots for the Apple iPad 8th Generation product.
Sample picture

Steps:
- Create a list of all available review images
- If required, view images using cv2.imshow method ()
- Read text from images using pytesseract
- Create a data frame
- Pre-process the text: remove special characters, stop words
- Build positive and negative word clouds
Paso 1: creates a list of all available review images
import os
folderPath = "Reviews"
myRevList = os.listdir(folderPath)
Paso 2: If required, view images using cv2.imshow method ()
for image in  myRevList:
    img = cv2.imread(f'{folderPath}/{image}')
    cv2.imshow("Image", img)
    cv2.waitKey(0)
    cv2.destroyAllWindows()
Paso 3: read text from images using pytesseract
import cv2
import pytesseract
pytesseract.pytesseract.tesseract_cmd=r'C:Program FilesTesseract-OCRtesseract.exe'
corpus = []
for images in myRevList:
img = cv2.imread(f'{folderPath}/{images}')
if img is None:
corpus.append("Could not read the image.")
else:
rev = pytesseract.image_to_string(img)
corpus.append(rev)
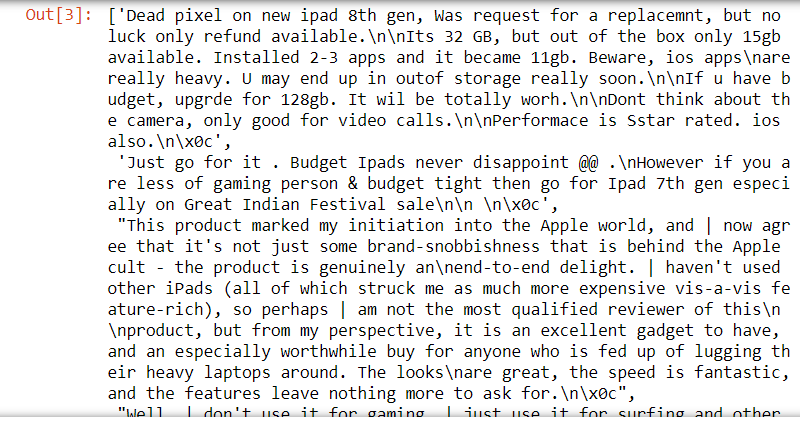
list(corpus)
corpus
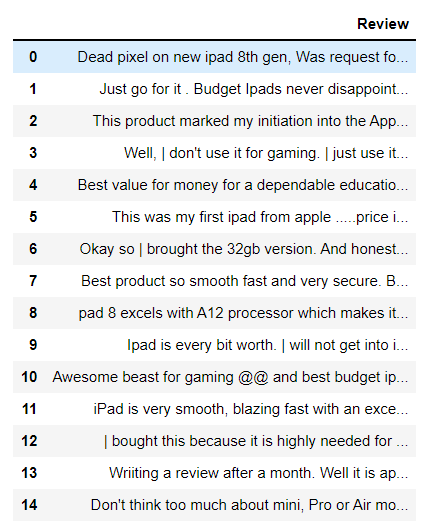
Paso 4: create a data frame
import pandas as pd
data = pd.DataFrame(list(corpus), columns=['Review'])
data
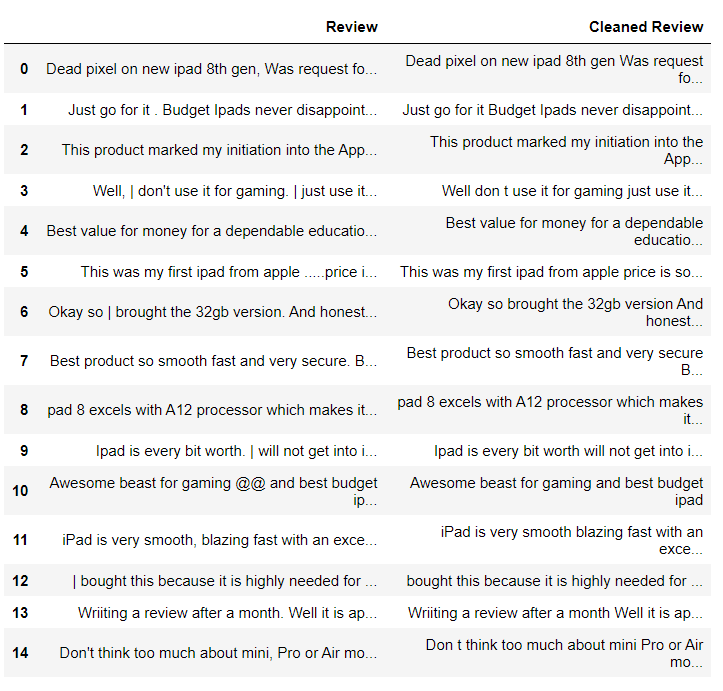
Paso 5: preprocess the text: remove special characters, empty words
#removing special characters
import re
def clean(text):
    return re.sub('[^ A-Za-z0-9" "]+', ' ', text)
data['Cleaned Review'] = data['Review'].apply(clean)
data
Removing Stop Words from the 'Clean Review’ and adding all the remaining words to a list variable “final_list”.
-
# removing stopwords
import nltk
from nltk.corpus import stopwords
nltk.download("Point")
from nltk import word_tokenize
stop_words = stopwords.words('english')

final_list = []
for column in data[['Cleaned Review']]:
    columnSeriesObj = data[column]
    all_rev = columnSeriesObj.values

    for i in range(len(all_rev)):
        tokens = word_tokenize(all_rev[i])
        for word in tokens:
            if word.lower() not in stop_words:
                final_list.append(word)
Paso 6: Build positive and negative word clouds
Install the word cloud library with the command “pip instalar wordcloud“.
In english language, we have a predefined set of positive and negative words called Opinion Lexicons. These files can be downloaded from Link or directly from me GitHub repository.
Once the files are downloaded, read those files in the code and create a list of positive and negative words.
with open(r"opinion-lexicon-Englishpositive-words.txt","r") as pos:
  poswords = pos.read().split("n")
with open(r"opinion-lexicon-Englishnegative-words.txt","r") as neg:
  negwords = neg.read().split("n")
Importing libraries to generate and display word clouds.
import matplotlib.pyplot as plt
from wordcloud import WordCloud
Positive word cloud
# Choosing the only words which are present in poswords
pos_in_pos = " ".join([w for w in final_list if w in poswords])
wordcloud_pos = WordCloud(
                      background_color="black",
                      width=1800,
                      height=1400
                     ).generate(pos_in_pos)
plt.imshow(wordcloud_pos)
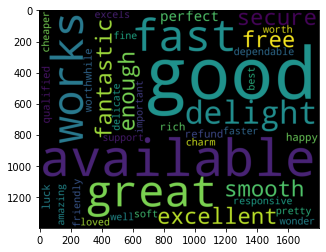
The word "good" is the most used word that catches our attention. If we look back at the reviews, people have written reviews saying that the iPad has a good screen, good sound, good software and hardware.
Negative word cloud
# Choosing the only words which are present in negwords
neg_in_neg = " ".join([w for w in final_list if w in negwords])
wordcloud_neg = WordCloud(
                      background_color="black",
                      width=1800,
                      height=1400
                     ).generate(neg_in_neg)
plt.imshow(wordcloud_neg)
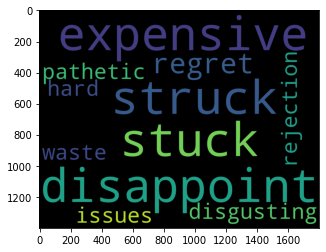
The words expensive, stuck, beaten, disappointment stood out in negative word cloud. If we look at the context of the word stuck, dice “Although it has only 3 GB of RAM, never get stuck”, which is a positive thing about the device.
Therefore, it's good to create bigrama word clouds / trigram so as not to lose context.
2. Create audible files (text to audio)
gTTS is a Python library with Google Translate's text-to-speech API.
For install, run the command “pip install gtts"At the command prompt.
Import required libraries
import cv2
import pytesseract
from gtts import gTTS
import os
Set the path of tesseract
pytesseract.pytesseract.tesseract_cmd=r'C:Program FilesTesseract-OCRtesseract.exe'
Read the image using cv2.imread () and grab the text from the image using pytesseract and save it to a variable.
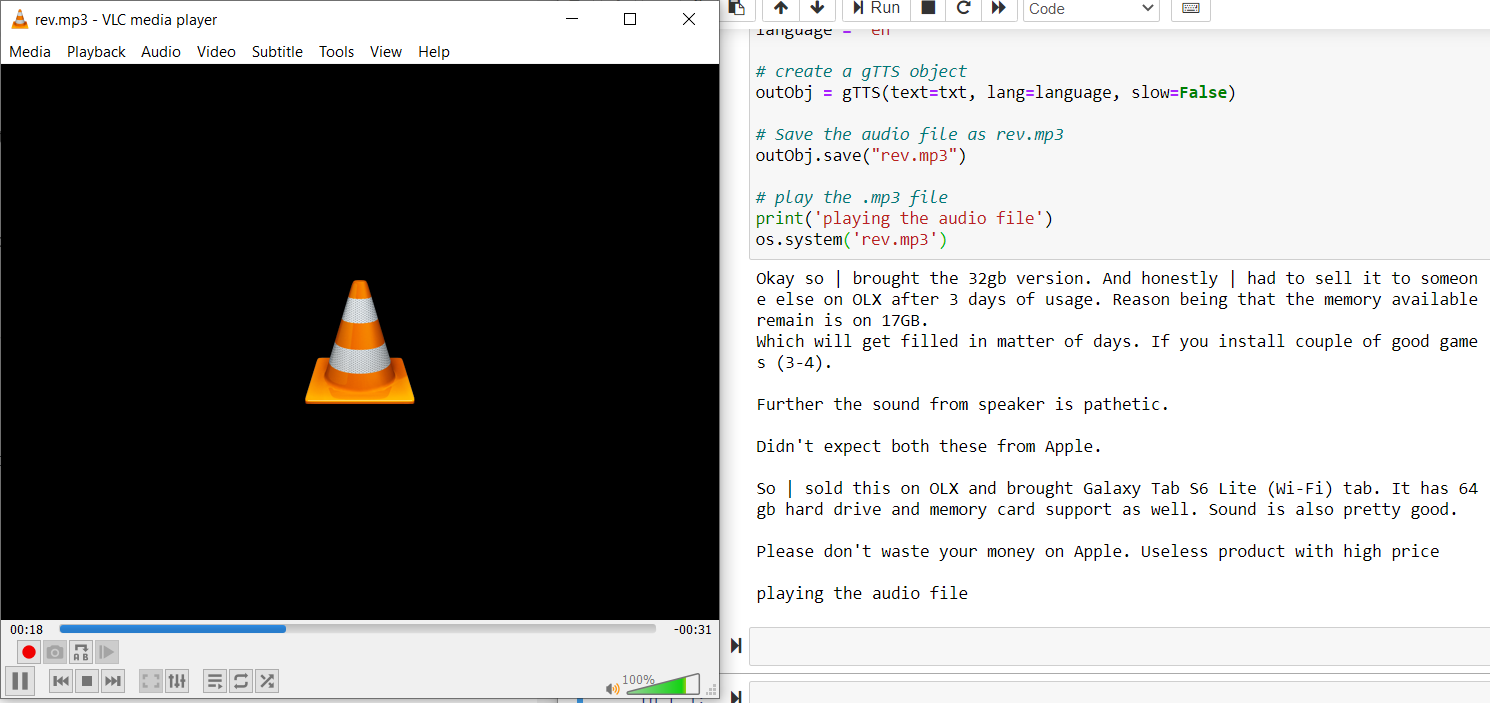
rev = cv2.imread("Reviews15.PNG")
# display the image using cv2.imshow() method
# cv2.imshow("Image", rev)
# cv2.waitKey(0)
# cv2.destroyAllWindows()
# grab the text from image using pytesseract
txt = pytesseract.image_to_string(rev)
print(txt)
Set the language and create a text to audio conversion using gTTS without going through the text, language
language="in"

outObj = gTTS(text=txt, lang=language, slow=False)
Save the audio file as “rev.mp3”
outObj.save("rev.mp3")
play the audio file
os.system('rev.mp3')
Complete code:
-
import cv2
import pytesseract
from gtts import gTTS
import os
rev = cv2.imread("Reviews15.PNG")

# cv2.imshow("Image", rev)
# cv2.waitKey(0)
# cv2.destroyAllWindows()

txt = pytesseract.image_to_string(rev)
print(txt)
language="in"
outObj = gTTS(text=txt, lang=language, slow=False)
outObj.save("rev.mp3")
print('playing the audio file')
os.system('rev.mp3')
Final notes
At the end of this article, we have understood the concept of optical character recognition (OCR) and we are familiar with reading images with OpenCV and capturing text from images with pytesseract. We have seen two basic OCR applications: build word clouds, create audible files by converting text to speech using gTTS.
References:
I hope this article is informative and, please, let me know if you have any queries or comments related to this article in the comment section. Happy learning 😊
The media shown in this article is not the property of DataPeaker and is used at the author's discretion.


