“Just as athletes cannot win without a sophisticated combination of strategy, shape, attitude, tactics and speed, performance engineering requires a good collection of metrics and tools to deliver the desired business results”.– Todd DeCapua
Introduction:
Over the years, adoption of machine learning to drive business decisions has increased exponentially. According to Forbes, ML is projected to grow to $ 30.6 billion for 2024 and it is not surprising to see the myriad of custom ML solutions invading the market that address specific business needs. The ease of availability of computing powers, cloud infrastructure and automation has accelerated it even further.
The current trend to harness the powers of ML in business has led data scientists and engineers to design solutions / innovative services and one of those services has been Model As A Service (MaaS). We have used many of these services without the knowledge of how they were built or served on the web, some examples include data visualization, facial recognition, natural language processing, predictive analytics and more. In summary, MaaS encapsulates all complex data, model training and evaluation, implementation, etc., and allows customers to consume them for their purpose.
As simple as it may seem to use these services, there are many challenges in creating such a service, for instance: How do we maintain the service? How do we ensure that the accuracy of our model does not decrease over time? etc. As with any service or application, an important factor to consider is the load or traffic that a service / API can handle to ensure your uptime. The best feature of the API is to have great performance and the only way to test this is by pressing the API to see how it responds. This is the load test.
In this blog, we will not only see how this service is built, but also how to test service load to plan for hardware requirements / infrastructure in the production environment. We will try to achieve it in the following order:
- Create a simple API with FastAPI
- Build a classification model in Python
- Wrap the model with FastAPI
- Test the API with the Postman client
- Load test with Locust
Let us begin !!
Creating a simple web API using FastAPI:
The following code shows the basic FastAPI implementation. The code is used to create a simple web API that, upon receiving a particular ticket, produces a specific output. Here is the code division:
- Load the libraries
- Create an application object
- Create a route with @ app.get ()
- Write a controller function that has a defined host and port number
from fastapi import FastAPI, Request
from typing import Dict
from pydantic import BaseModel
import uvicorn
import numpy as np
import pickle
import pandas as pd
import json
app = FastAPI()
@app.get("/")
async def root():
    return {"message": "Built with FastAPI"}
if __name__ == '__main__':
    uvicorn.run(app, host="127.0.0.1", port=8000)
Once executed, you can navigate to the browser with the url: http: // localhost: 8000 and observe the result which in this case will be ‘ Built with FastAPI ‘
Creating an API from an ML model using FastAPI:
Now that you have a clear idea of FastAPI, let's see how you can wrap a machine learning model (developed in Python) in an API in Python. I will use the dataset (diagnosis) Wisconsin Breast Cancer. The goal of this ML project is to predict whether a person has a benign or malignant tumor. I will use VSCode as my editor and note that we will test our service with Mailman Client. These are the steps we will follow.
- We will first build our classification model: KNeighborsClassifier ()
- Build our server file which will have logic for API in the FlastAPI structure.
- Finally, we will test our service with Mailman
Paso 1: Classification model
A simple classification model with the standard process of loading data, split data into train / proof, followed by building the model and saving the model in the pickle format to the unit. I will not go into the details of the construction of the model, since the article is about load testing.
import pandas as pd
import numpy as np
from sklearn.model_selection import train_test_split
from sklearn.neighbors import KNeighborsClassifier
import joblib, pickle
import os
import yaml
# folder to load config file
CONFIG_PATH = "../Configs"
# Function to load yaml configuration file
def load_config(config_name):
    """[The function takes the yaml config file as input and loads the the config]
    Args:
        config_name ([yaml]): [The function takes yaml config as input]
    Returns:
        [string]: [Returns the config]
    """
    with open(os.path.join(CONFIG_PATH, config_name)) as file:
        config = yaml.safe_load(file)
    return config
config = load_config("config.yaml")
#path to the dataset
filename = "../../Data/breast-cancer-wisconsin.csv"
#load data
data = pd.read_csv(filename)
#replace "?" with -99999
data = data.replace('?', -99999)
# drop id column
data = data.drop(config["drop_columns"], axis=1)
# Define X (independent variables) and y (target variable)
X = np.array(data.drop(config["target_name"], 1))
y = np.array(data[config["target_name"]])
X_train, X_test, y_train, y_test = train_test_split(
    X, Y, test_size=config["test_size"], random_state= config["random_state"]
)
# call our classifier and fit to our data
classifier = KNeighborsClassifier(
    n_neighbors=config["n_neighbors"],
    weights=config["weights"],
    algorithm=config["algorithm"],
    leaf_size=config["leaf_size"],
    p=config["p"],
    metric=config["metric"],
    n_jobs=config["n_jobs"],
)
# training the classifier
classifier.fit(X_train, y_train)
# test our classifier
result = classifier.score(X_test, y_test)
print("Accuracy score is. {:.1f}".format(result))
# Saving model to disk
pickle.dump(classifier, open('../../FastAPI//Models/KNN_model.pkl','wb'))
You can access the full code from Github
Paso 2: compile the API with FastAPI:
We will build on the basic example we did in a previous section.
Load the libraries:
from fastapi import FastAPI, Request
from typing import Dict
from pydantic import BaseModel
import uvicorn
import numpy as np
import pickle
import pandas as pd
import json
Load the saved KNN model and write a routing function to return the Json:
app = FastAPI()
@app.get("/")
async def root():
    return {"message": "Hello World"}
# Load the model
# model = pickle.load(open('../Models/KNN_model.pkl','rb'))
model = pickle.load(open('../Models/KNN_model.pkl','rb'))
@app.post('/predict')
def pred(body: dict):
    """[summary]
    Args:
        body (dict): [The pred methos takes Response as input which is in the Json format and returns the predicted value from the saved model.]
    Returns:
        [Json]: [The pred function returns the predicted value]
    """
    # Get the data from the POST request.
    data = body
    varList = []
    for val in data.values():
        varList.append(val)
    # Make prediction from the saved model
    prediction = model.predict([varList])
    # Extract the value
    output = prediction[0]
    #return the output in the json format
    return {'The prediction is ': output}
# 5. Run the API with uvicorn
#    Will run on http://127.0.0.1:8000
if __name__ == '__main__':
    """[The API will run on the localhost on port 8000]
    """
    uvicorn.run(app, host="127.0.0.1", port=8000)
You can access the full code from Github.
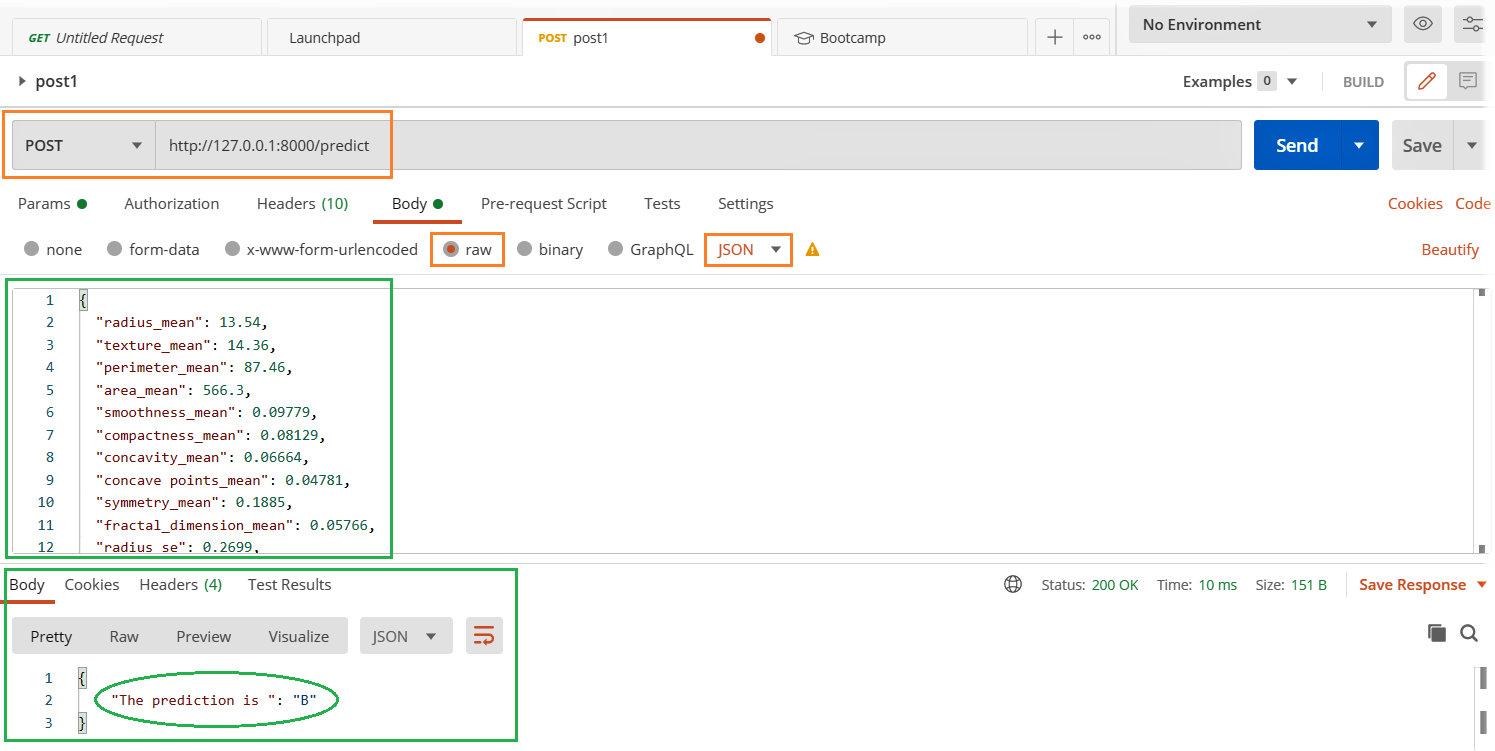
Using Postman Client:
In our previous section, we create a simple API in which pressing the http: // localhost: 8000 in the browser we got an output message “Built with FastAPI”. This is fine as long as the output is simpler and a user or system input is expected. But we are building a model as a service in which we send data as input for the model to predict.. In that case, we will need a better and easier way to test it. we will use postman to test our API.
- Run the server.py file
- Open the Postman client and fill in the relevant details highlighted below and hit the submit button.
- See the result in the answer section below.
Are your applications and services stable under maximum load?
Time to load test:
We will explore the Locust library for load testing and the easiest way to install Langosta it is
pip install locust
Let's create a perf.py file with the following code. I have referred to the code Quick start lobster page
import time
import json
from locust import HttpUser, task, between
class QuickstartUser(HttpUser):
    wait_time = between(1, 3)
    @task(1)
    def testFlask(self):
        load = {
        "radius_mean": 13.54,
        "texture_mean": 14.36,
        ......
	......
        "fractal_dimension_worst": 0.07259}
        myheaders = {'Content-Type': 'application/json', 'Accept': 'application/json'}
        self.client.post("/predict", data= json.dumps(load), headers=myheaders)
Access the full code file from Github
Start lobster: Navigate to the directory perf.py and run the following code.
locust -f perf.py
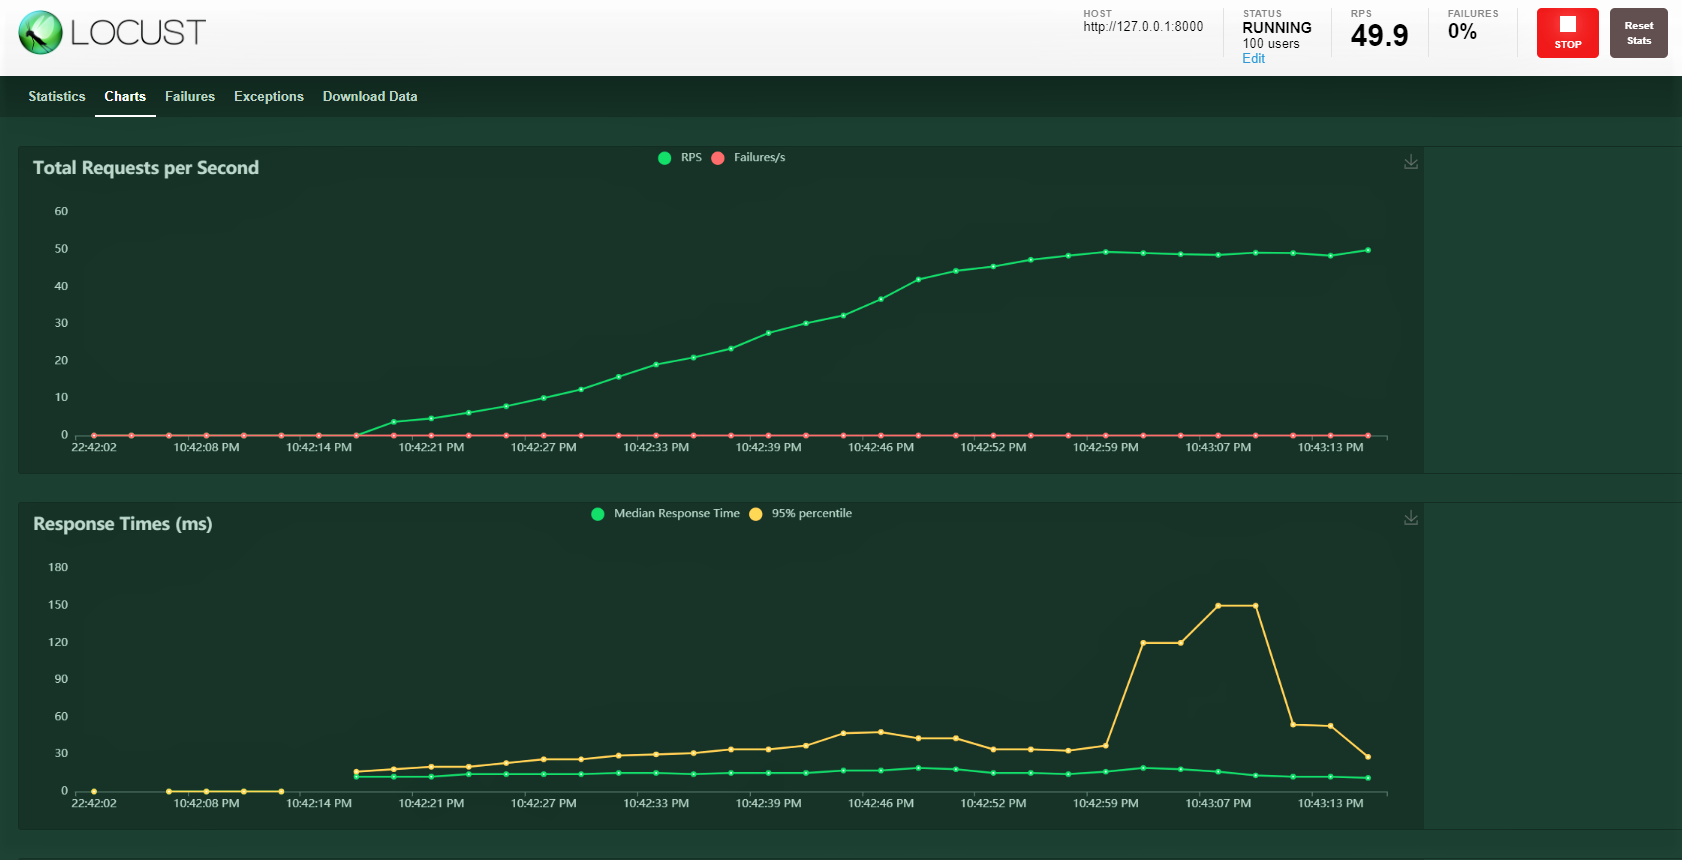
Interfaz web Locust:
Once you have started Locust with the above command, navigate to a browser and point it to http: // localhost: 8089. You should see the following page:

Let's try with 100 users, generation ratio 3 y host: http: 127.0.0.1: 8000 where our API is running. You can see the following screen. You can see the load increase over time and response time, a graphical representation shows the mean time and other metrics.
Note: make sure server.py is running.

Conclution:
We cover a lot on this blog, from building a model, closing with a FastAPI, the service test with the postman and finally the performance of a load test with 100 simulated users accessing our service with a gradually increasing load. We were able to monitor how the service is responding.
Most of the time there are enterprise-level SLAs that must be met, namely, keep a certain threshold for a response time like 30ms or 20ms. If SLAs are not met, there are potential financial implications depending on the contract or the loss of customers, as they did not receive the service quickly enough.
A load test helps us understand the maximum and potential points of failure. Later, we can plan proactive action by increasing our hardware capacity and, if the service is deployed in the Kubernetes configuration type, configure it to increase the number of pods with increasing load.
Happy learning !!!!
You can connect with me – Linkedin
You can find the code for reference: Github
References
https://docs.locust.io/en/stable/quickstart.html
https://fastapi.tiangolo.com/
https://unsplash.com/
The media shown in this article is not the property of DataPeaker and is used at the author's discretion.


