“Prediction is very difficult, especially if it's about the future”.
any ideas after reading the beautiful quote above. I have explained different automated libraries to automate machine learning and NLP task in my previous articles. Similarly, in this article, I will explain "How to automate time series prediction using Auto-TS".
Auto-TS is part of AutoML that will automate some of the components of the machine learning process. This automates libraries and helps non-experts train a basic machine learning model without having much knowledge in the field. Here In this article, I will discuss how to automate the implementation of a time series forecast model using the Auto-TS library.
What is Auto-TS?
It is an open source Python library that is basically used to automate time series forecasting. It will automatically train multiple time series models using a single line of code, which will help us to choose the best one for our problem statement.
In the open source Python library, Auto-TS, auto-ts.Auto_TimeSeries () is the main function that you will call with your train data. Later, we can choose what kind of models you want, as statistical-based models, ml o FB. We can also adjust the parameters that will automatically select the best model based on the scoring parameter we want it to be based on.. It will return the best model and a dictionary containing predictions for the number of Forecast_periods you mentioned (default = 2).
Auto-TS Library Features:
- Find the optimal time series prediction model by optimizing genetic programming.
- Train naive models, statistics, machine learning and deep learning, with all possible hyperparameter settings and cross validation.
- Perform data transformations to handle messy data by learning optimal NaN imputation and outlier removal.
- Choice of combination of metrics for model selection.
Installation:
pip install autots  OR
pip3 install auto-ts   OR
pip install git+git://github.com/AutoViML/Auto_TS
Requirements:
dask
scikit-learn
FB Prophet
statsmodels
pmdarima
XGBoost
Import library using:
from auto_ts import auto_timeseries
Parameters available in auto_timeseries:
model = auto_timeseries( score_type="rmse", time_interval="Month", non_seasonal_pdq=None, seasonality=False, seasonal_period=12, model_type=['Prophet'], verbose=2)
You can tune the parameters and analyze the change in model performance. For more details on the parameters, click on here.
Data set used:
Here I have used the Amazon share price data set for January 2006 to January 2018, which is downloaded from Kaggle. This library only offers train time series prediction models. The dataset must have a date or time format column.
Initially, load the time series dataset with a datetime column:
df = pd.read_csv("Amazon_Stock_Price.csv", usecols =['Date', 'Close'])
df['Date'] = pd.to_datetime(df['Date'])
df = df.sort_values('Date')
Now, divide all data into test and train data:
train_df = df.iloc[:2800]
test_df = df.iloc[2800:]
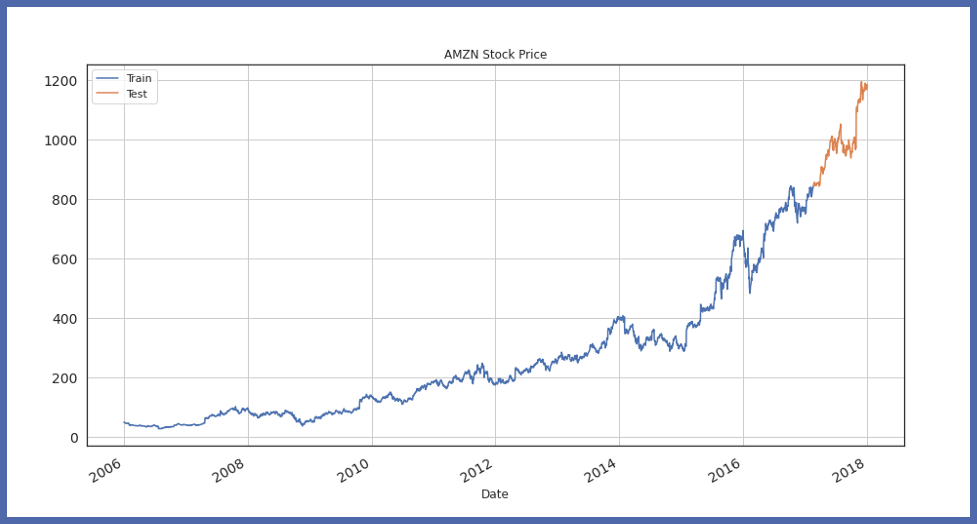
Now, we will visualize the test division of the train:
train_df.Close.plot(figsize=(15,8), title="AMZN Stock Price", fontsize=14, label="Train")
test_df.Close.plot(figsize=(15,8), title="AMZN Stock Price", fontsize=14, label="Test")
plt.legend()
plt.grid()
plt.show()
Now, let's initialize the Auto-TS model object and fit the training data:
model = auto_timeseries(forecast_period=219, score_type="rmse", time_interval="D", model_type="best")
model.fit(traindata= train_df, ts_column="Date", target="Close")
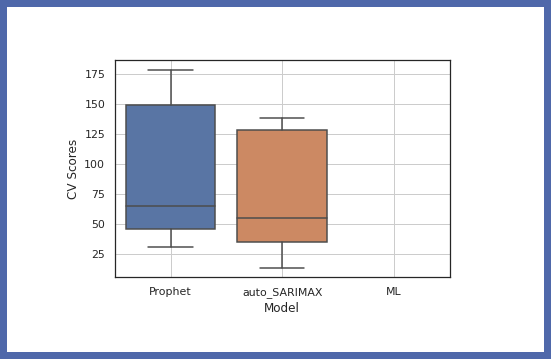
Now let's compare the accuracy of different models:
model.get_leaderboard()
model.plot_cv_scores()
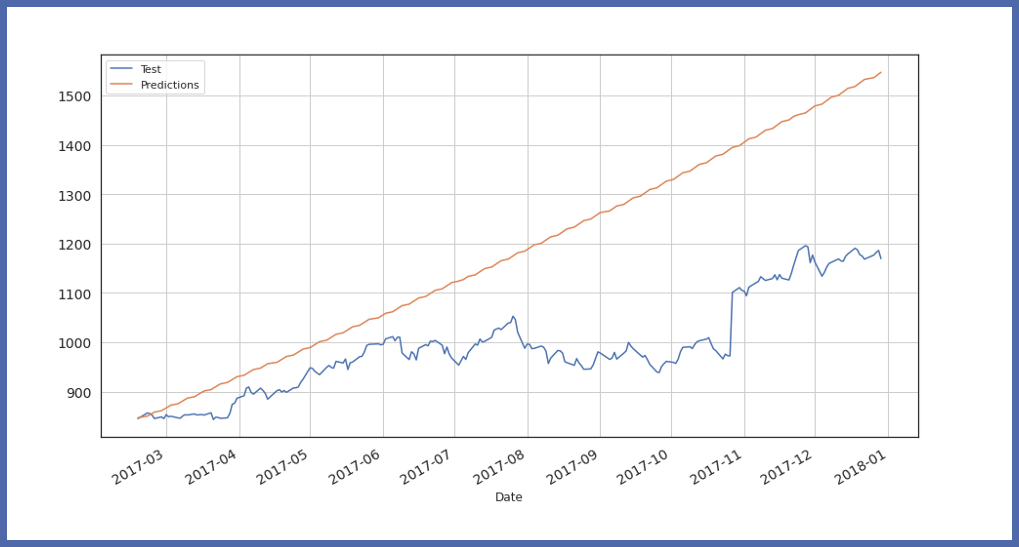
Now let's test our model with test data:
future_predictions = model.predict(testdata=219)
Finally, view the value and prediction of the test data:
Parameters available in auto_timeseries:
model = auto_timeseries( score_type="rmse", time_interval="Month", non_seasonal_pdq=None, seasonality=False, seasonal_period=12, model_type=['Prophet'], verbose=2)
Parameters available in model.fit ():
model.fit( traindata=train_data, ts_column=ts_column, target=target, cv=5, sep="," )
Parameters available in model.predict ():
predictions = model.predict( testdata = can be either a dataframe or an integer standing for the forecast_period, model="best" or any other string that stands for the trained model )
You can play with all these parameters and analyze the performance of our model and then you can select the most suitable model for your problem statement.. You can check all these parameters in detail by clicking here.
Conclution:
In this article, I have discussed how the time series model can be automated in one line of Python code. Auto-TS performs data preprocessing, as it removes outliers from data and handles messy data by learning optimal NaN imputation. Using just one line of code, initializing the Auto-TS object and adjusting the train data, will automatically train multiple time series models like ARIMA, SARIMAX, FB Prophet, WHERE, and will generate the best performing model that is suitable for our problem statement. The output of the model seems to depend on the size of the data set. If we try to increase the size of the dataset, the result can definitely improve.
EndNote
Hope you enjoyed this article. Any question? Have i missed something? Please, contact me LinkedIn Or leave a comment below. And finally, … No need to say,
Thank you for reading!
Health!!
The media shown in this article is not the property of DataPeaker and is used at the author's discretion.


