This article was published as part of the Data Science Blogathon
Introduction
There have been a number of developments in the field of deep learningDeep learning, A subdiscipline of artificial intelligence, relies on artificial neural networks to analyze and process large volumes of data. This technique allows machines to learn patterns and perform complex tasks, such as speech recognition and computer vision. Its ability to continuously improve as more data is provided to it makes it a key tool in various industries, from health... and computer vision. Especially with the introduction of very deep convolutional neural networks, These models helped achieve state-of-the-art results on problems such as image recognition and image classification.
Then, over the years, deep learning architectures got deeper and deeper (adding more layers) to solve increasingly complex tasks, which also helped to improve the performance of classification and recognition tasks and also to make them robust.
But when we keep adding more layers to the red neuronalNeural networks are computational models inspired by the functioning of the human brain. They use structures known as artificial neurons to process and learn from data. These networks are fundamental in the field of artificial intelligence, enabling significant advancements in tasks such as image recognition, Natural Language Processing and Time Series Prediction, among others. Their ability to learn complex patterns makes them powerful tools.., it becomes much more difficult to train and the accuracy of the model starts to saturate and then also degrades. Here comes the ResNet to rescue us from that scenario and help solve this problem.
What is ResNet?
Residual Network (ResNet) is one of the famous deep learning models introduced by Shaoqing Ren, Kaiming He, Jian Sun and Xiangyu Zhang in their article. The document was named “Deep residual learning for image recognition”. [1] in 2015. The ResNet model is one of the most popular and successful deep learning models so far.
Residual blocks
The problem of training very deep networks has been alleviated with the introduction of these residual blocks and the ResNet model is made up of these blocks.
The problem of training very deep networks has been alleviated with the introduction of these residual blocks and the ResNet model is made up of these blocks.
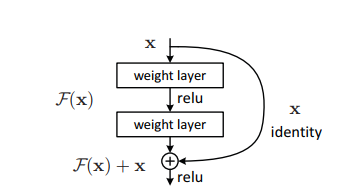
In the figure"Figure" is a term that is used in various contexts, From art to anatomy. In the artistic field, refers to the representation of human or animal forms in sculptures and paintings. In anatomy, designates the shape and structure of the body. What's more, in mathematics, "figure" it is related to geometric shapes. Its versatility makes it a fundamental concept in multiple disciplines.... anterior, the first thing we can notice is that there is a direct connection that omits some layers of the model. This connection is called “jump connection” and it's the heart of the residual blocks. The output is not the same due to this jump connection. Without the jump connection, the 'X entry is multiplied by the layer weights followed by adding a skew term.
Then comes the wake functionThe activation function is a key component in neural networks, since it determines the output of a neuron based on its input. Its main purpose is to introduce nonlinearities into the model, allowing you to learn complex patterns in data. There are various activation functions, like the sigmoid, ReLU and tanh, each with particular characteristics that affect the performance of the model in different applications...., f () and we get the output as H (x).
H (x) = f (wx + b) o H (x) = f (x)
Now, with the introduction of a new jump connection technique, the output is H (x) it changes to
H (x) = f (x) + x
But the dimension"Dimension" It is a term that is used in various disciplines, such as physics, Mathematics and philosophy. It refers to the extent to which an object or phenomenon can be analyzed or described. In physics, for instance, there is talk of spatial and temporal dimensions, while in mathematics it can refer to the number of coordinates necessary to represent a space. Understanding it is fundamental to the study and... of the input may vary from that of the output, what might happen with a convolutional coverThe Convolutional Layer, fundamental in convolutional neural networks (CNN), It is mainly used for data processing with grid-like structures, as pictures. This layer applies filters that extract relevant features, such as edges and textures, allowing the model to recognize complex patterns. Its ability to reduce the dimensionality of data and maintain essential information makes it a key tool in computer vision tasks.. or grouped layers. Therefore, this problem can be handled with these two approaches:
· Zero is padded with the jump connection to increase its dimensions.
· Convolutional layers are added 1 × 1 at the entrance to match the dimensions. In that case, the output is:
H (x) = f (x) + w1.x
Here an extra parameter w1 is added while no extra parameter is added when using the first approach.
This connection bypass technique in ResNet solves the problem of the disappearance of the gradientGradient is a term used in various fields, such as mathematics and computer science, to describe a continuous variation of values. In mathematics, refers to the rate of change of a function, while in graphic design, Applies to color transition. This concept is essential to understand phenomena such as optimization in algorithms and visual representation of data, allowing a better interpretation and analysis in... on deep CNNs by allowing an alternate shortcut path for the gradient to flow. What's more, bypass connection helps if any layer hurts architecture performance, then it will be omitted by means of the regularizationRegularization is an administrative process that seeks to formalize the situation of people or entities that operate outside the legal framework. This procedure is essential to guarantee rights and duties, as well as to promote social and economic inclusion. In many countries, Regularization is applied in migratory contexts, labor and tax, allowing those who are in irregular situations to access benefits and protect themselves from possible sanctions.....
ResNet architecture
There is a simple network of 34 layers in architecture that is inspired by VGG-19 in which direct access connection or hop connections are added. These hop connections or residual blocks then convert the architecture into the residual network as shown in the figure below.
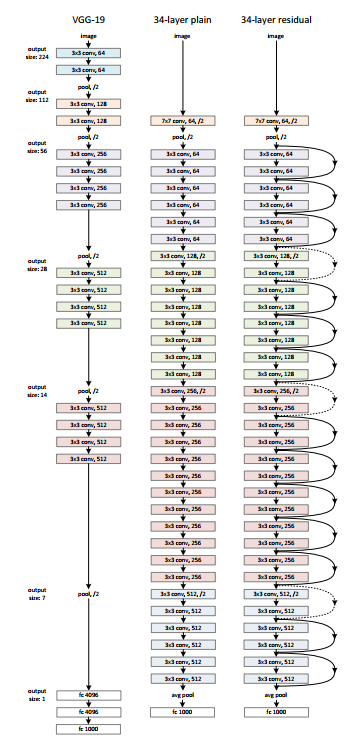
Source: ‘Deep residual learning for image recognition‘ paper
Using ResNet with Keras:
Keras is an open source deep learning library capable of running on top of TensorFlow. Keras Applications provides the following versions of ResNet.
– ResNet50
– ResNet50V2
– ResNet101
– ResNet101V2
– ResNet152
– ResNet152V2
Let's build ResNet from scratch:
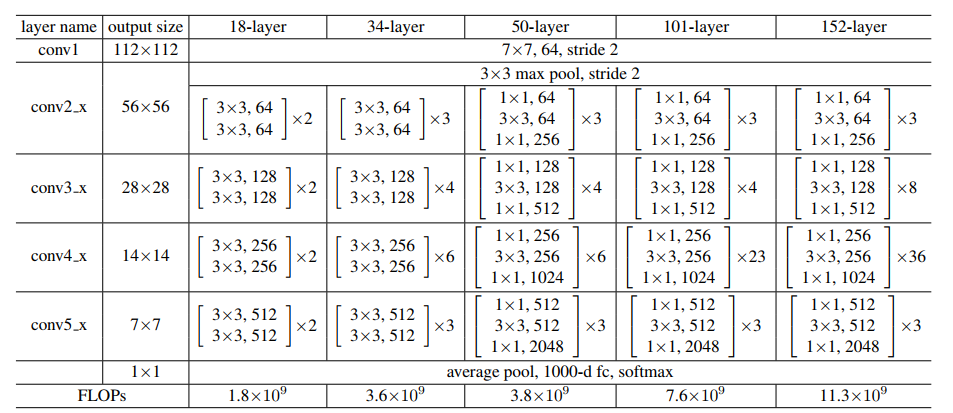
Source: ‘Deep residual learning for image recognition‘ paper
Let's keep the image above for reference and start building the network..
ResNet architecture uses CNN blocks multiple times, so let's create a class for the CNN block, which takes input channels and output channels. There is a batchnorm2d after each layer of conv.
import torch
import torch.nn as nn
class block(nn.Module):
    def __init__(
        self, in_channels, intermediate_channels, identity_downsample=None, stride=1
    ):
        super(block, self).__init__()
        self.expansion = 4
        self.conv1 = nn.Conv2d(
            in_channels, intermediate_channels, kernel_size=1, stride=1, padding=0, bias=False
        )
        self.bn1 = nn.BatchNorm2d(intermediate_channels)
        self.conv2 = nn.Conv2d(
            intermediate_channels,
            intermediate_channels,
            kernel_size=3,
            stride=stride,
            padding=1,
            bias=False
        )
        self.bn2 = nn.BatchNorm2d(intermediate_channels)
        self.conv3 = nn.Conv2d(
            intermediate_channels,
            intermediate_channels * self.expansion,
            kernel_size=1,
            stride=1,
            padding=0,
            bias=False
        )
        self.bn3 = nn.BatchNorm2d(intermediate_channels * self.expansion)
        self.relu = nn.ReLU()
        self.identity_downsample = identity_downsample
        self.stride = stride

    def forward(self, x):
        identity = x.clone()

        x = self.conv1(x)
        x = self.bn1(x)
        x = self.relu(x)
        x = self.conv2(x)
        x = self.bn2(x)
        x = self.relu(x)
        x = self.conv3(x)
        x = self.bn3(x)

        if self.identity_downsample is not None:
            identity = self.identity_downsample(identity)

        x += identity
        x = self.relu(x)
        return x
Later, create a ResNet class that takes input from multiple blocks, covers, image channels and the number of classes.
In the following code, the ‘_make_layer function’
create the ResNet layers, which takes the input of blocks, the number of residuals
blocks, output channel and strides.
class ResNet(nn.Module):
    def __init__(self, block, layers, image_channels, num_classes):
        super(ResNet, self).__init__()
        self.in_channels = 64
        self.conv1 = nn.Conv2d(image_channels, 64, kernel_size=7, stride=2, padding=3, bias=False)
        self.bn1 = nn.BatchNorm2d(64)
        self.relu = nn.ReLU()
        self.maxpool = nn.MaxPool2d(kernel_size=3, stride=2, padding=1)
# Essentially the entire ResNet architecture are in these 4 lines below
self.layer1 = self._make_layer(
block, layers[0], intermediate_channels=64, stride=1
)
self.layer2 = self._make_layer(
block, layers[1], intermediate_channels=128, stride=2
)
self.layer3 = self._make_layer(
block, layers[2], intermediate_channels=256, stride=2
)
self.layer4 = self._make_layer(
block, layers[3], intermediate_channels=512, stride=2
)

self.avgpool = nn.AdaptiveAvgPool2d((1, 1))
self.fc = nn.Linear(512 * 4, num_classes)

def forward(self, x):
x = self.conv1(x)
x = self.bn1(x)
x = self.relu(x)
x = self.maxpool(x)
x = self.layer1(x)
x = self.layer2(x)
x = self.layer3(x)
x = self.layer4(x)

x = self.avgpool(x)
x = x.reshape(x.shape[0], -1)
x = self.fc(x)

return x

def _make_layer(self, block, num_residual_blocks, intermediate_channels, stride):
identity_downsample = None
layers = []

# Either if we half the input space for ex, 56x56 -> 28x28 (stride=2), or channels changes
# we need to adapt the Identity (skip connection) so it will be able to be added
# to the layer that's ahead


if stride != 1 or self.in_channels != intermediate_channels * 4:
identity_downsample = nn.Sequential(
nn.Conv2d(
self.in_channels,
intermediate_channels * 4,
kernel_size=1,
stride=stride,
bias=False
),
nn.BatchNorm2d(intermediate_channels * 4),
)

layers.append(
block(self.in_channels, intermediate_channels, identity_downsample, stride)
)

# The expansion size is always 4 for ResNet 50,101,152
self.in_channels = intermediate_channels * 4

# For example for first resnet layer: 256 will be mapped to 64 as intermediate layer,
# then finally back to 256. Hence no identity downsample is needed, since stride = 1,
# and also same amount of channels.
for i in range(num_residual_blocks - 1):
layers.append(block(self.in_channels, intermediate_channels))
return nn.Sequential (* covers)
Then define different versions of ResNet
– For ResNet50, the sequence of layers is [3, 4, 6, 3].
– For ResNet101, the sequence of layers is [3, 4, 23, 3].
– For ResNet152, the sequence of layers is [3, 8, 36, 3]. (Ask the ‘Deep residual learning for image recognition‘ paper)
def ResNet50(img_channel=3, num_classes=1000):
    return ResNet(block, [3, 4, 6, 3], img_channel, num_classes)
def ResNet101(img_channel=3, num_classes=1000):
return ResNet(block, [3, 4, 23, 3], img_channel, num_classes)


def ResNet152(img_channel=3, num_classes=1000):
return ResNet(block, [3, 8, 36, 3], img_channel, num_classes)
Later, write a little test code to check if the model is working fine.
def test():
    net = ResNet101(img_channel=3, num_classes=1000)
    device = "miracles" if torch.cuda.is_available() else "cpu"
    y = net(torch.randn(4, 3, 224, 224)).to(device)
    print(y.size())
test()
For the test case above, the output must be:
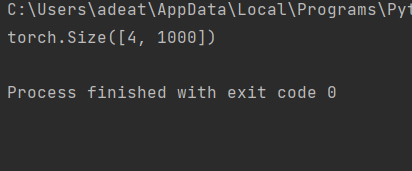
The full code can be accessed here:
https://github.com/BakingBrains/Deep_Learning_models_implementation_from-scratch_using_pytorch_/blob/main/ResNet_.py
[1]. Kaiming He, Xiangyu Zhang, Shaoqing Ren, Jian Sun: Residual deep learning for image recognition, December of 2015, DOI: https://arxiv.org/abs/1512.03385
Thanks.
Your suggestions and doubts are welcome here in the comments section. Thanks for reading my article!


