Joining the post from our partner Aaron on the application of approval workflows for the vacations of the work team in the work calendars Sharepoint onlineToday I will try to teach you how to have in a single calendar view all the events that we need distinguished by colors, and if it was not enough, along the way we will learn the use of columns and views in conjunction with the option of overlapping calendars.
PASO 1: Defining event categories
Once the calendar has been created by adding the corresponding application to the contents of our site, we have the possibility of creating a new column with the types of event that we want to define or starting from the column “Category” which is included by default when adding this application.

This column already includes some of the most frequent event categories, so in this case we will edit it by clicking on it in the calendar settings, to adapt it to our needs.

After the column changes are completed, we proceed to save them by pressing the corresponding button.
PASO 2: Create views filtered by category
Once we have the column with the categories of events that we are going to use in our calendar, we proceed to create the views filtered by these categories. For it, we go to the previous screen (the calendar settings screen) and we scroll down to the bottom where we can see the panelA panel is a group of experts that meets to discuss and analyze a specific topic. These forums are common at conferences, seminars and public debates, where participants share their knowledge and perspectives. Panels can address a variety of areas, from science to politics, and its objective is to encourage the exchange of ideas and critical reflection among the attendees.... view management.
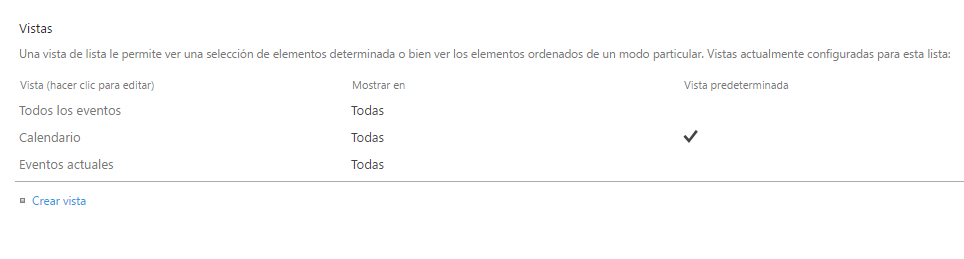
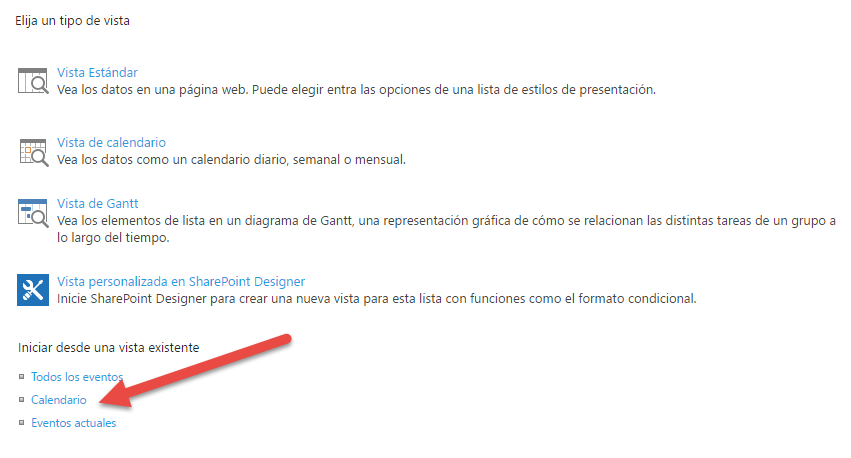
We click on create view and within this menu we choose to create a view from our existing view of the calendar. It is very important to start from this view and not from any of the other two views created by default every time we want to create one of our views filtered by category.
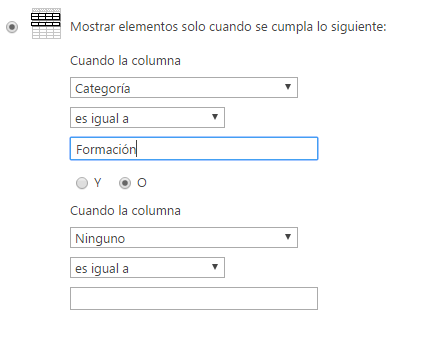
Once in the creation of the view we will have to define that only the elements that coincide with one of the fields of the column are shown, in this first case we are creating the view for the events of “Training” so we select that they will be Only calendar events that match this element will be displayed in its category column.
Now we only have to repeat this process to create a filtered view for each of the categories of the column.

PASO 3: Create the base view
Now we will have to create a view like the previous ones that will serve as a base to superimpose the rest of the views on top of it. To do this we will create a new view but in this case we will mark the default view as check and we will select the category column but we will not equalize it to anything.
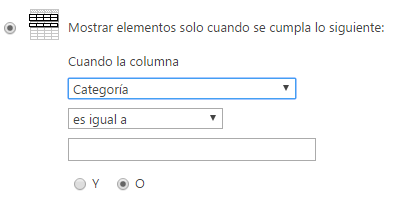
This allows us to avoid possible errors of double samples of events, as this base view will never match any of the events that are created by selecting a field in the category column.
PASO 4: Add overlapping views
In this last step we will create the calendar overlays in the base view, for this we will access the overlays tab in the calendar menu.

Then, we click on new calendar and fill out the parametersThe "parameters" are variables or criteria that are used to define, measure or evaluate a phenomenon or system. In various fields such as statistics, Computer Science and Scientific Research, Parameters are critical to establishing norms and standards that guide data analysis and interpretation. Their proper selection and handling are crucial to obtain accurate and relevant results in any study or project.... of this overlay. In this step is where we will be allowed to link a category with its corresponding color.
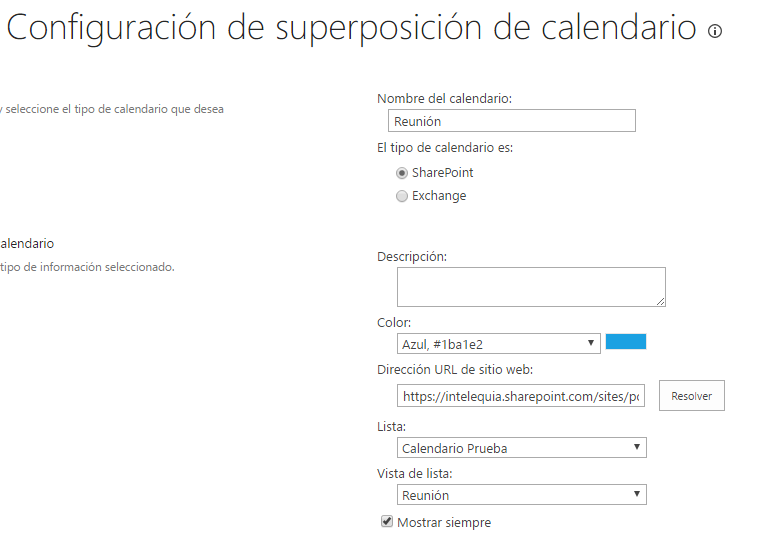
To be able to select the list and the corresponding list view, you must click the solve button.
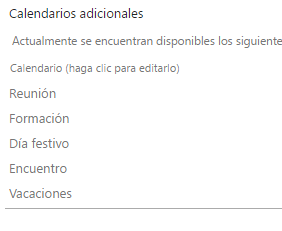
Once we create all the overlays, the events created with the related category will appear in our calendar, once all have been added you will be able to see your new calendar with the color differentiation finished.